LEGO Architecture Guide 2025: All 25+ Sets Ranked + Expert Building Tips
Supporting Free Content
When you purchase through our links, we earn a small commission at no extra cost to you. As an Amazon Associate and eBay Partner, this helps us keep bringing you expert LEGO® reviews and guides. Thank you for your support!
From your first skyline to recreating world landmarks, this guide teaches you everything about LEGO Architecture—building techniques, design principles, and creating museum-quality displays.
LEGO Architecture bridges the gap between play and art, offering builders the chance to recreate iconic landmarks and modern masterpieces. Whether you're drawn to the minimalist beauty of skyline collections or the intricate complexity of the Eiffel Tower (10307) or Colosseum (10276), this comprehensive guide will transform you from a curious beginner into a confident architectural builder.
- Why Architecture Sets Are Perfect for Adults
- Beginner Builds: Skylines & Small Landmarks
- Intermediate: Scale, Proportion & Building Techniques
- Advanced: Large Landmarks & Complex Structures
- Understanding Architectural Design Principles
- Display Strategies for Architecture Collections
- Creating Custom MOCs (My Own Creations)
- Investment Value & Market Trends
Why Architecture Sets Are Perfect for Adults
LEGO Architecture stands apart from other themes for several compelling reasons:
Sophisticated Aesthetics
- Monochromatic palettes: Elegant use of white, tan, black, and gray
- Clean lines: Modernist design principles that look professional on display
- Office-appropriate: Sophisticated enough for professional environments
- Timeless appeal: No branded characters or themes that "age" the display
Educational Value
- Architectural history: Learn about famous structures and their designers
- Engineering principles: Understand how real buildings achieve stability
- Scale and proportion: Grasp mathematical relationships in design
- Cultural significance: Appreciate landmarks from around the world
Skill Development
- Precision building: Tight tolerances and exact placement matter
- Advanced techniques: SNOT, offset building, texture creation
- Problem-solving: Recreating curves and irregular shapes with rectangular bricks
- Patience training: Large builds require sustained focus
Beginner Builds: Skylines & Small Landmarks
Start with Skyline Collections
Skyline sets are the perfect entry point into Architecture for three key reasons:
- Affordable: $40-$70 price range
- Quick builds: 2-4 hours to completion
- Impressive results: Instantly recognizable landmarks at small scale
- Collection-friendly: Multiple skylines display beautifully together
Recommended First Builds:
1. New York City Skyline (21028-1)
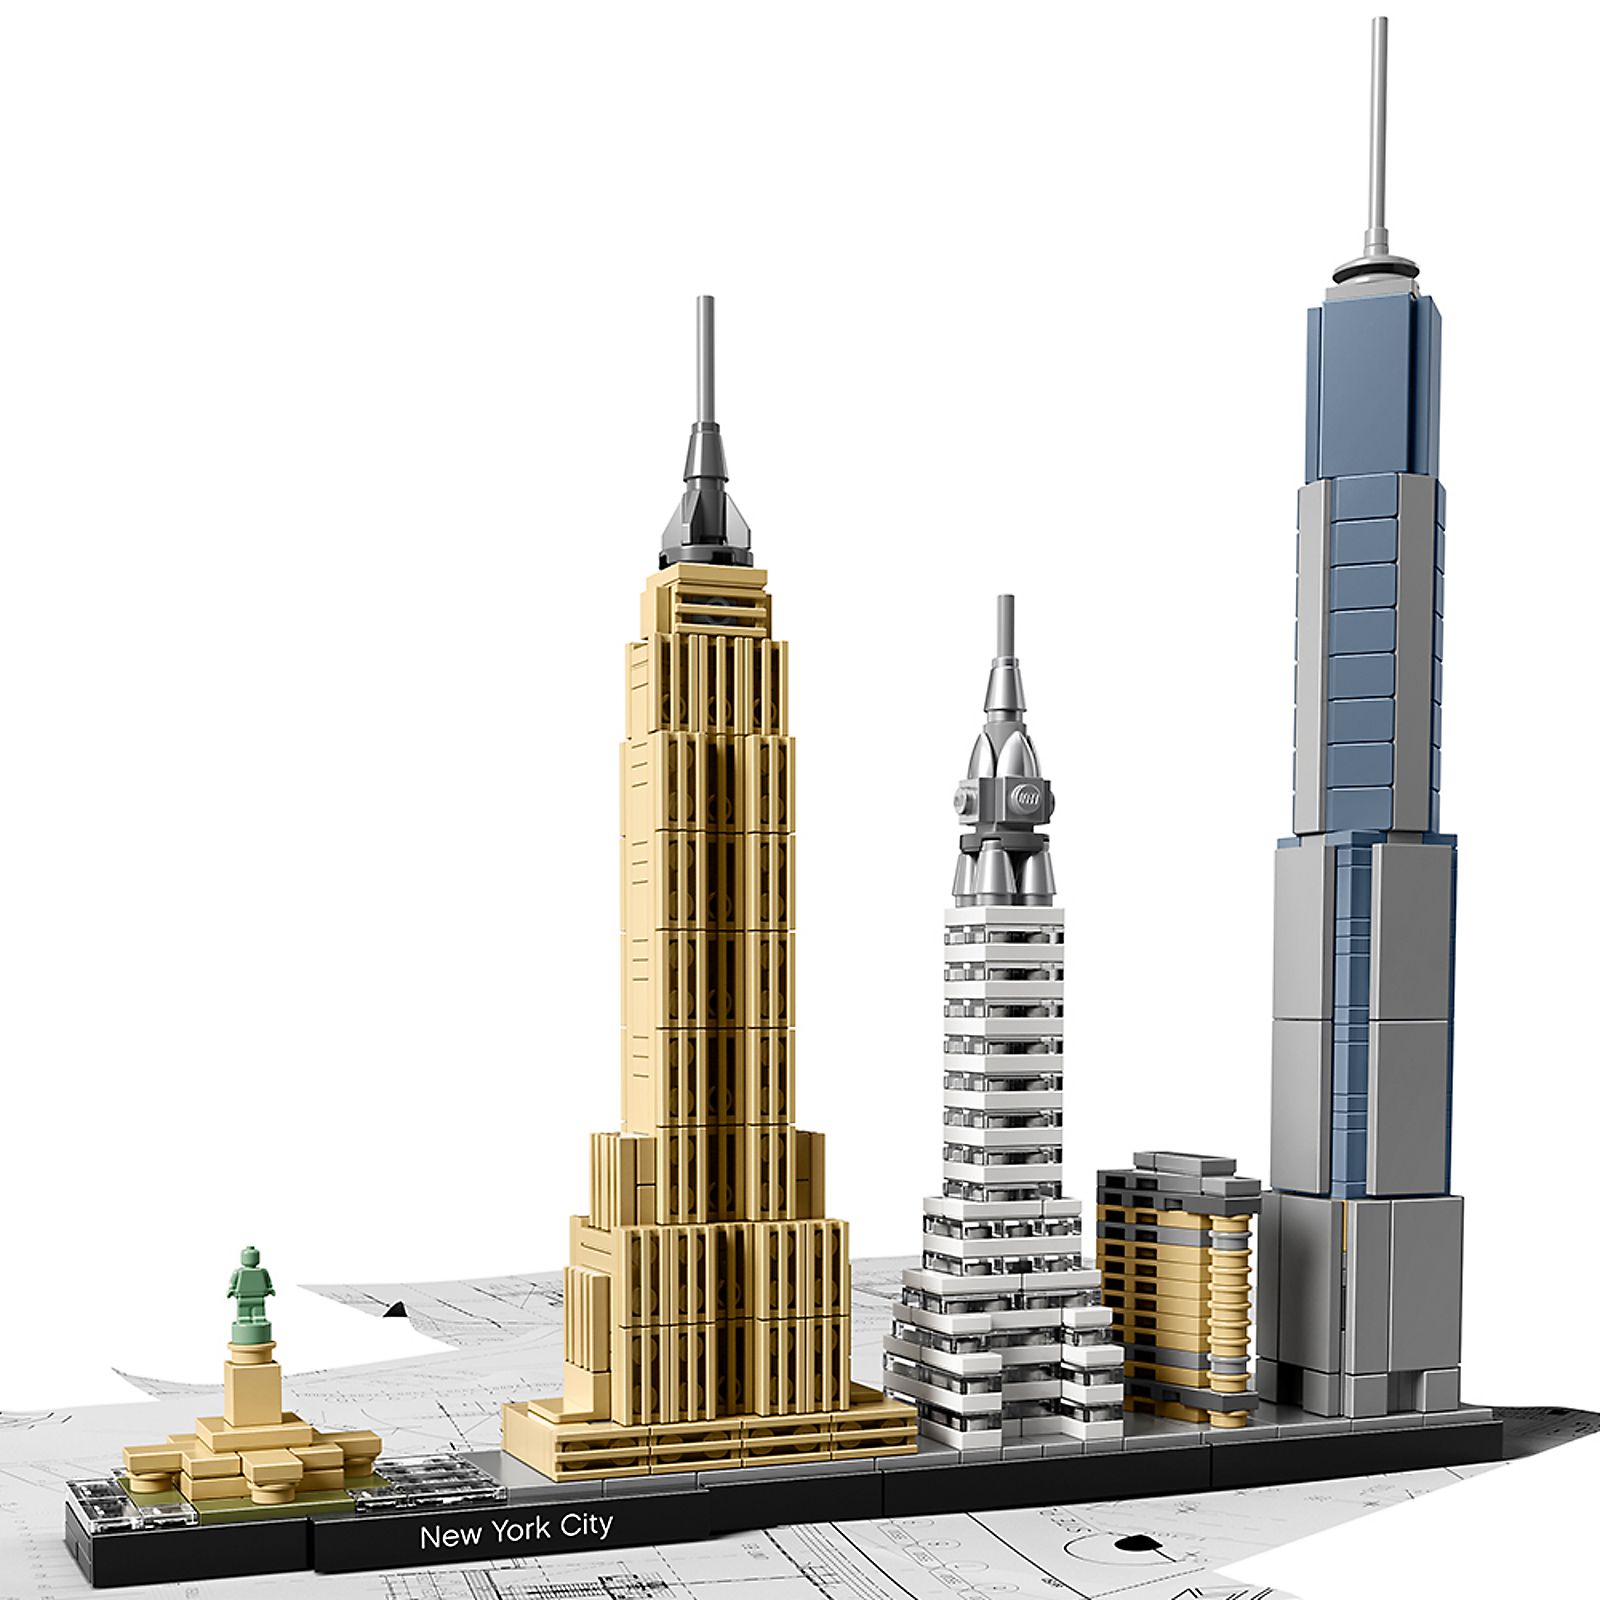
Capture the architectural essence of NYC with iconic landmarks. Perfect for travel enthusiasts and LEGO collectors.
598 pieces | $59.99 | 10" wide
Features: Statue of Liberty, Empire State Building, Chrysler Building, One World Trade Center, Flatiron Building
Why it's perfect for beginners:
- Instantly recognizable structures
- Variety of building techniques in one set
- Includes printed name tile for display
- Good piece-to-price ratio
2. London Skyline (21034-1)
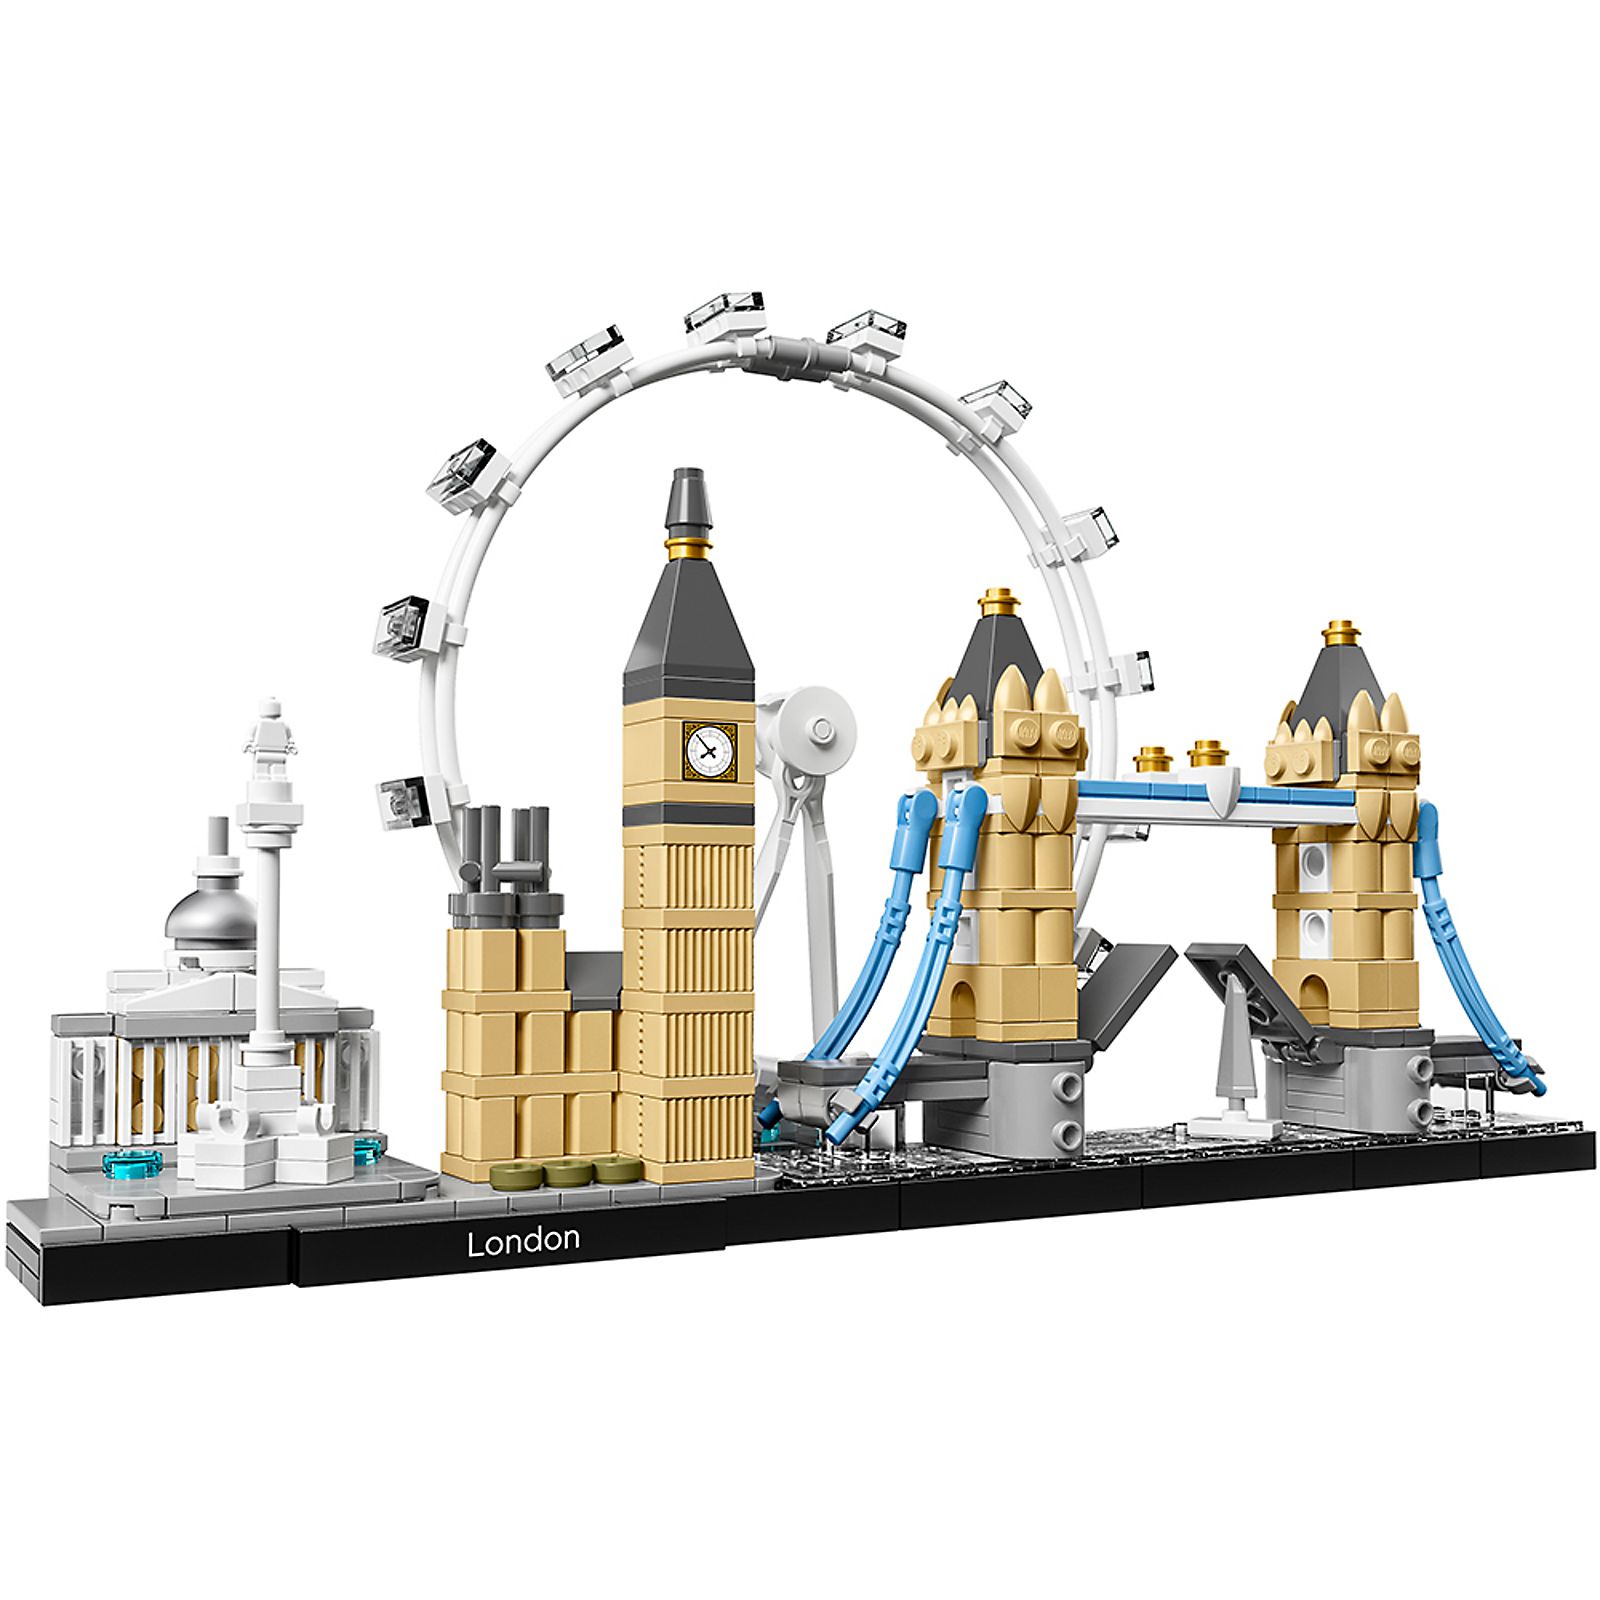
468 pieces | $49.99 | 11" wide
Features: National Gallery, Nelson's Column, London Eye, Big Ben, Tower Bridge
Learning opportunities:
- Transparent pieces for the London Eye
- Bridge construction techniques
- Gothic architecture representation (Big Ben)
- Mixing scale effectively
Building Your First Skyline: Step-by-Step Guide
Phase 1: Preparation (15 minutes)
- Clear workspace: 2'×2' minimum area
- Sort pieces: Organize by color first (blacks, whites, tans, grays)
- Review instructions: Scan all pages to understand the building sequence
- Identify landmarks: Know which structure you're building at each step
Phase 2: Base Construction (30-45 minutes)
Skylines start with a common baseplate or tile foundation. Key tips:
- Ensure the base is perfectly level—this affects everything above
- Pay attention to spacing between landmarks
- The base often includes printed tiles for city names
Phase 3: Individual Landmarks (90-150 minutes)
Each landmark is a mini-project. Common beginner challenges:
Challenge: Small pieces falling off during construction
Solution: Build on a flat surface, not in your lap. Use gentle pressure when attaching small details.
Challenge: Pieces not aligning perfectly
Solution: Backtrack 2-3 steps. One misplaced piece early cascades into misalignment later.
Challenge: Difficulty distinguishing similar gray shades
Solution: Build near a window for natural light. Light Bluish Gray vs Dark Bluish Gray are common confusion points.
Phase 4: Final Assembly & Display (15 minutes)
- Attach any remaining details (flags, antennas)
- Apply printed name tile to base
- Choose display location (see Display Strategies section)
- Take a completion photo for your records
Skill Assessment: Are You Ready for Intermediate?
After completing 1-2 skyline builds, evaluate your readiness for larger sets:
✅ You're ready for intermediate if you can:
- Build for 2-3 hours without frustration
- Identify LEGO pieces by their formal names (1×2 plate, 1×4 brick, etc.)
- Catch instruction errors before they cause major problems
- Understand why certain techniques create specific visual effects
- Appreciate the design choices in representing real structures
⏸️ Stay at beginner level longer if you:
- Still frequently backtrack due to missed steps
- Find building sessions mentally exhausting after 60 minutes
- Struggle with SNOT (Studs Not On Top) techniques
- Can't visualize how 2D instructions translate to 3D builds
Intermediate: Scale, Proportion & Building Techniques
Understanding Architectural Scale
LEGO Architecture uses various scales depending on the subject:
| Scale Type | Piece Count | Typical Height | Examples |
|---|---|---|---|
| Micro Scale (1:2000+) | 400-800 | 4-12" | Skyline collections |
| Mini Scale (1:500-1:1000) | 800-2,000 | 8-20" | Trafalgar Square, Arc de Triomphe |
| Medium Scale (1:200-1:500) | 2,000-5,000 | 15-30" | White House, Notre-Dame |
| Large Scale (1:100-1:200) | 5,000-10,000+ | 30-60" | Eiffel Tower, Colosseum |
Recommended Intermediate Sets
1. Taj Mahal (21056-1)

Recreate this architectural marvel with 2024 pieces and display a symbol of eternal love and historical significance.
2,022 pieces | $119.99 | 11" wide × 11" deep × 5" tall
Why it's the perfect intermediate step:
- Symmetry practice: Identical left and right sides teach precision
- Repetitive techniques: Build confidence through pattern recognition
- Dome construction: Learn to create curves with rectangular bricks
- Multiple building planes: Base, walls, minarets, central dome
- Decorative elements: Intricate details without overwhelming complexity
Time investment: 8-12 hours over 3-4 sessions
2. The White House (21054-1)
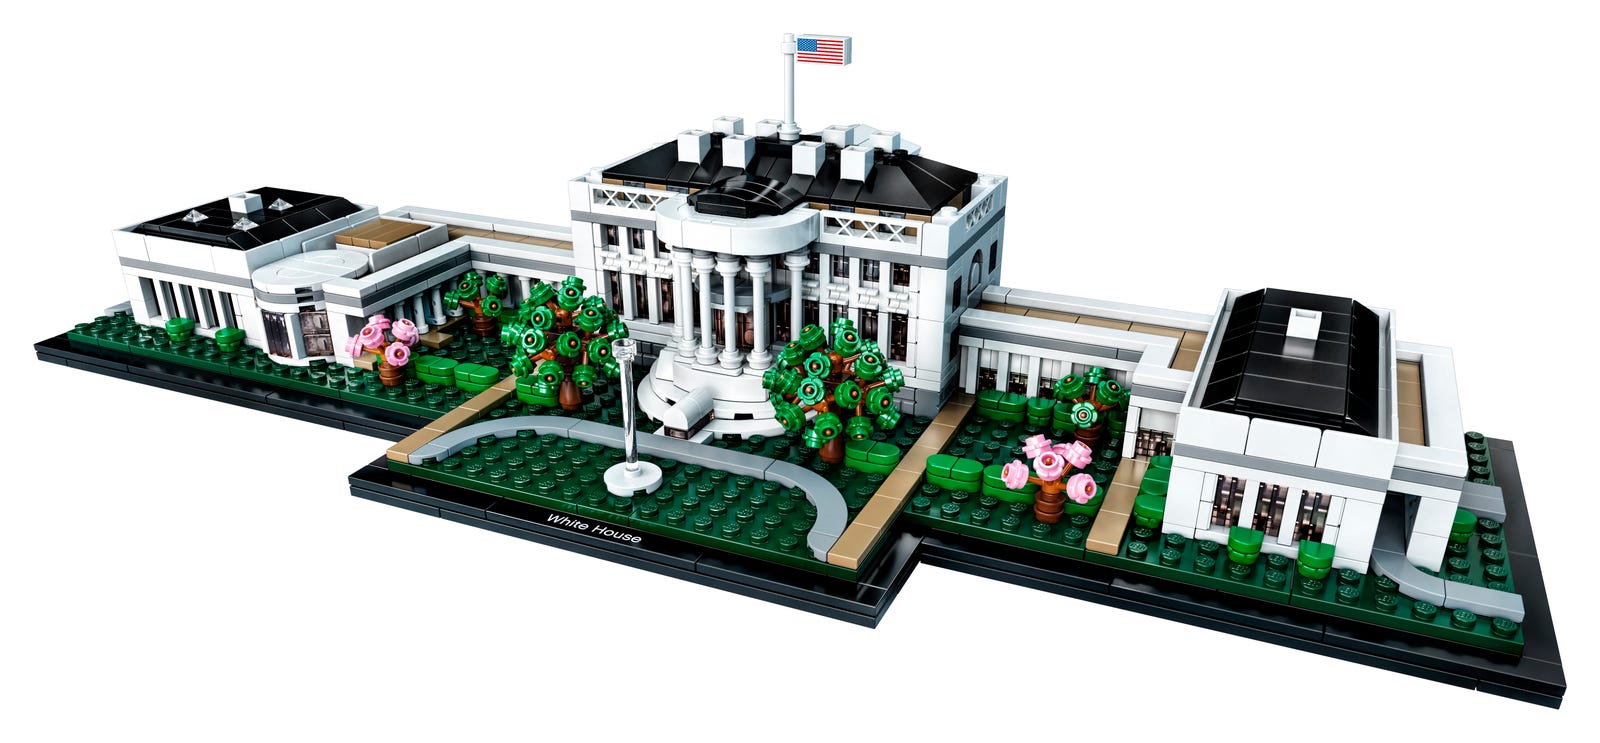
Recreate the neoclassical design and splendor of this world-famous residence with 1483 pieces. Perfect for architecture enthusiasts and history buffs!
1,483 pieces | $99.99 | 18" wide × 7" deep × 6" tall
Key learning opportunities:
- Classical architecture: Columns, pediments, symmetrical facades
- Interior suggestions: Partially detailed interior rooms
- Landscape integration: Front lawn, fountain, gates
- Multiple white shades: Master distinguishing subtle color variations
Intermediate Building Techniques Explained
SNOT (Studs Not On Top)
What it is: Building pieces sideways or upside-down instead of the traditional vertical stacking.
Why Architecture uses it extensively:
- Creates smooth wall surfaces without visible studs
- Allows for detailed decorative elements
- Enables columns, arches, and curves
- Achieves more realistic proportions
Common SNOT techniques in Architecture:
- Bracket pieces: Turn building 90° for side-building
- Headlight bricks: Studs on the side for attaching perpendicular elements
- Travis bricks: Create offset patterns
- Cheese slopes: Smooth transitions and decorative details
Texture Creation
Real buildings have varied textures—smooth glass, rough stone, patterned brick. LEGO Architecture replicates this through:
- Tile vs plate patterns: Alternating smooth tiles with studded plates for visual interest
- Color variation: Mixing similar shades (light gray, dark gray, white) for depth
- Offset rows: Brick bond patterns that mirror real masonry
- Greebling: Small details (1×1 plates, clips, bars) that add complexity
Structural Integrity Techniques
Large Architecture builds require internal support that's invisible from the outside:
- Internal framework: Hidden Technic pins and beams
- Interlocking layers: Alternating brick orientations for strength
- Weight distribution: Heavy elements at the base, lighter on top
- Anchor points: Critical connections that bear load
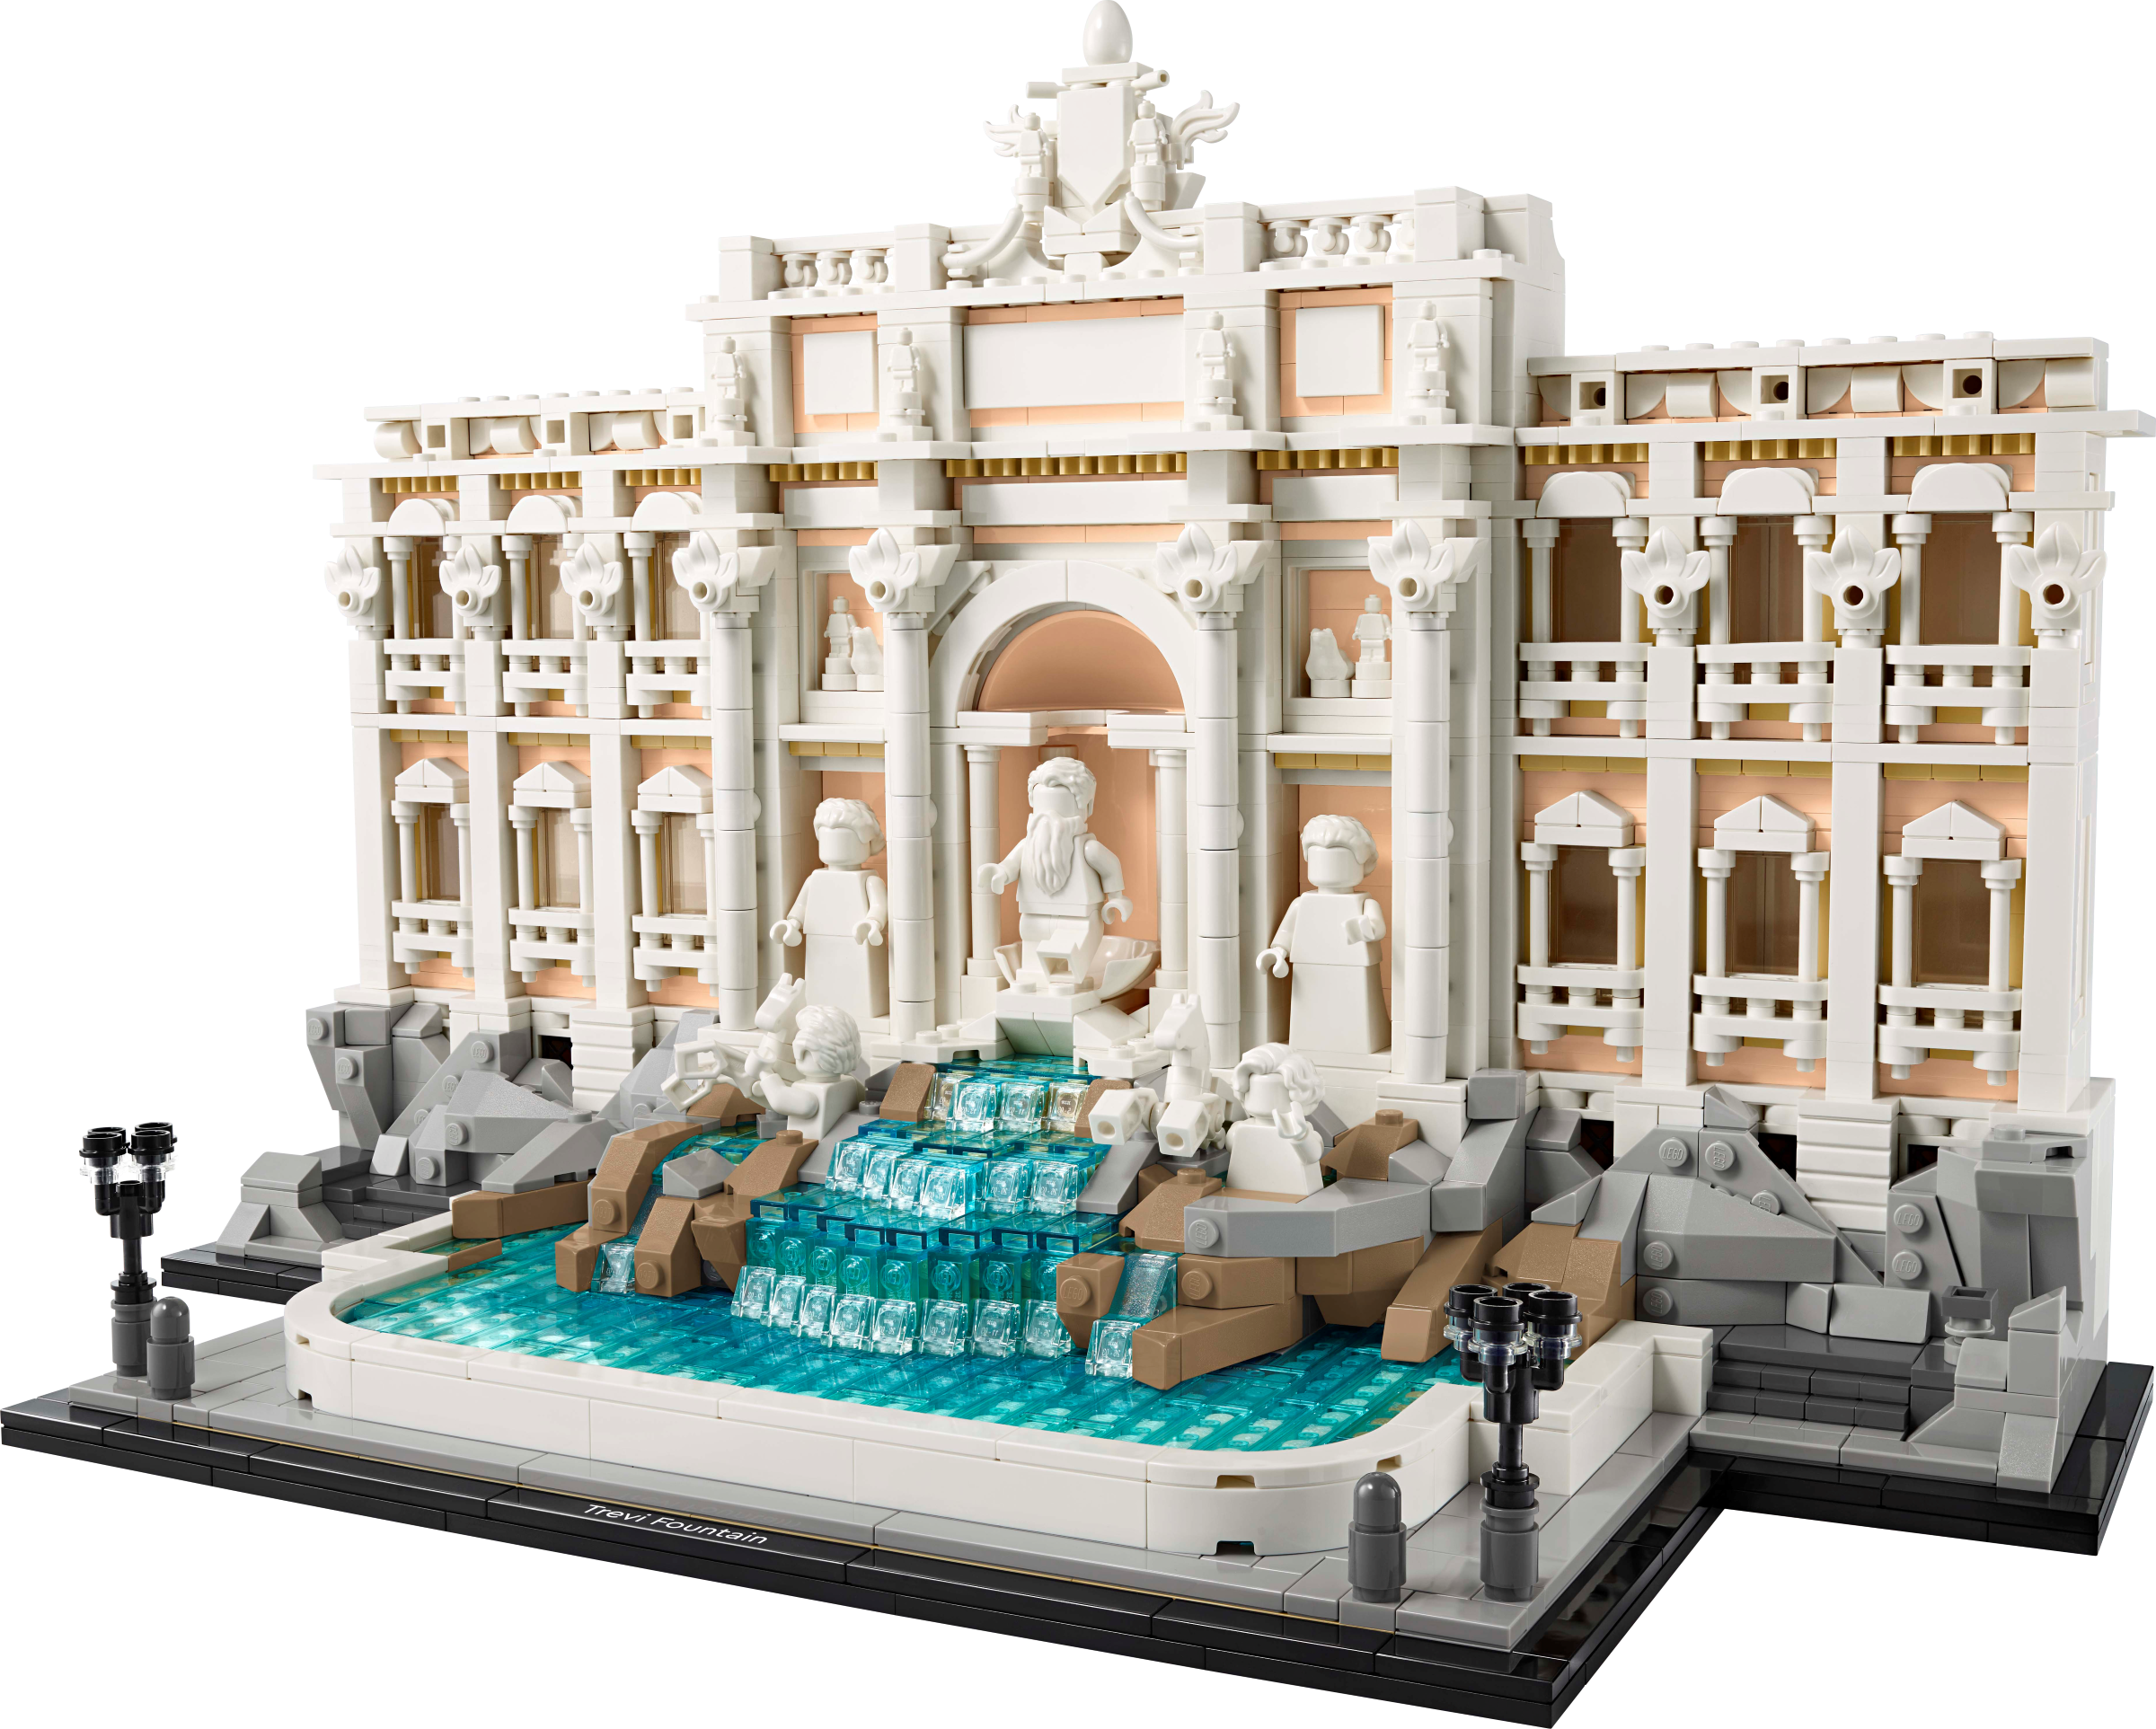
Advanced: Large Landmarks & Complex Structures
The Flagship Architecture Builds
These are the sets that define Architecture mastery. They're expensive, time-consuming, and absolutely worth it.
The Colosseum (10276-1) - Engineering Marvel

Experience an epic construction challenge with 9,036 pieces, recreating the grandeur of Rome's most iconic landmark. A rewarding build for architecture and history enthusiasts alike.
9,036 pieces | $599.99 | 23" wide × 20" deep × 11" tall
The Colosseum is LEGO's most elaborate Architecture achievement. At 9,036 pieces, it demonstrates what's possible when engineering and artistry align.
Why it's exceptional:
- Three seating levels: Accurately represents the tiered Roman structure
- Architectural orders: Doric, Ionic, and Corinthian columns at different levels
- Aged appearance: Intentional incomplete sections show historical damage
- Repetitive building: 80+ arches teach rhythm and consistency
- Display impact: Commands attention in any room
Build experience:
- Time: 40-60 hours spread over 2-4 weeks
- Physical demands: Heavy (8+ lbs completed), requires sturdy display surface
- Repetitive satisfaction: Building 80 arches is meditative once you master the technique
- Instruction quality: Exceptionally clear for such complexity
- Display space: 2'×2' minimum footprint—measure first
- Budget: $600 is a significant investment—wait for sales if possible
- Time commitment: Ensure you have 2-3 hour building blocks available
- Patience level: Repetitive building isn't for everyone
Eiffel Tower (10307-1) - Vertical Challenge
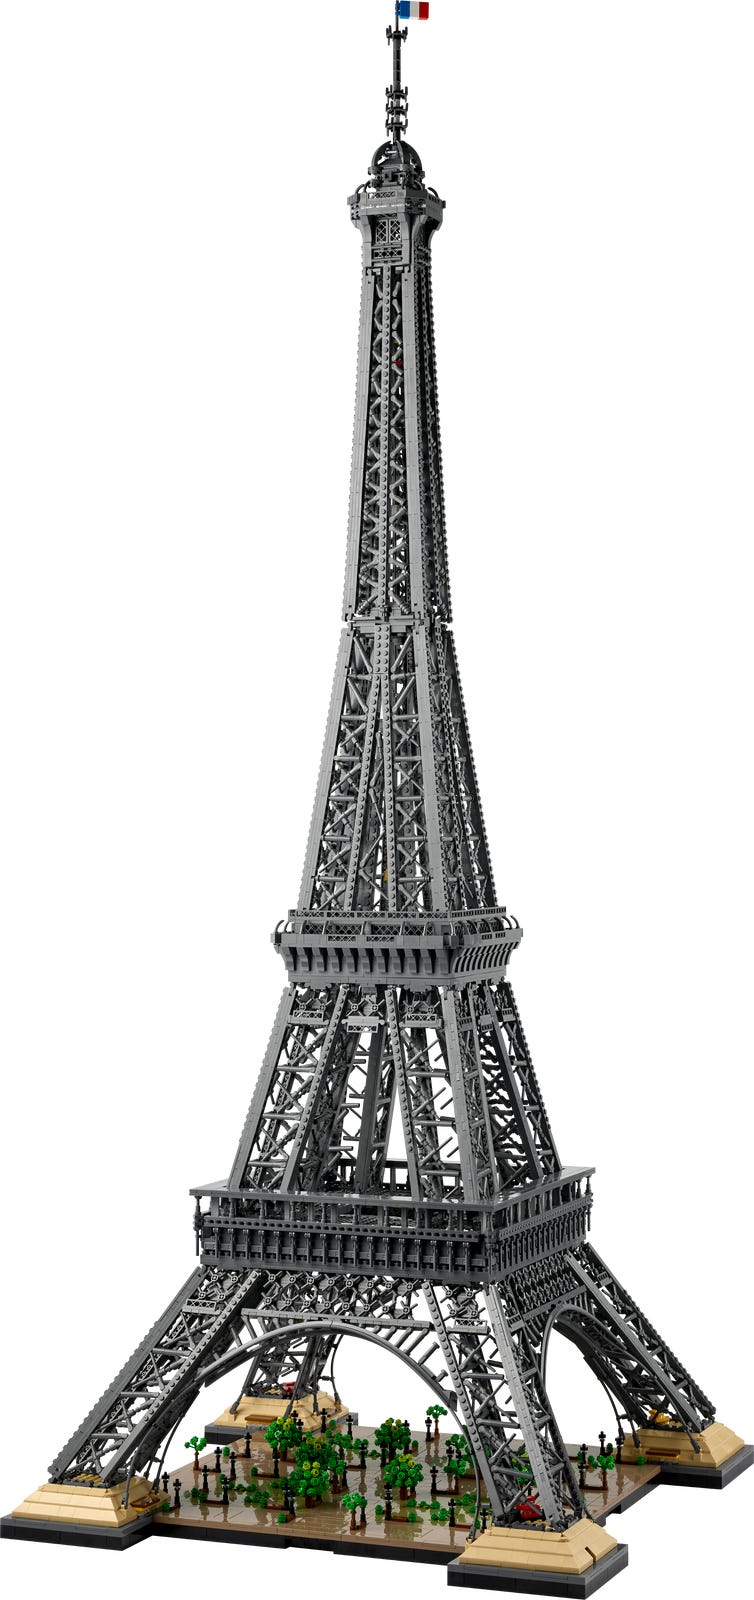
Experience the awe-inspiring challenge of building the tallest LEGO set ever, with 10,001 pieces of architectural history.
10,001 pieces | $649.99 | 58" tall when fully extended
The Eiffel Tower is LEGO's tallest set to date. It's not just a model—it's a statement piece.
Unique features:
- Modular sections: Four buildable levels that stack
- Internal lift shaft: Functional elevator mechanism
- Iron lattice design: Open framework mimics the real structure
- Display flexibility: Can be displayed at different heights (29", 43", or full 58")
Advanced challenges:
- Vertical building: Working upward rather than outward
- Precise alignment: Sections must interlock perfectly
- Tapered design: Each level is slightly smaller—maintaining proportion is critical
- Internal mechanisms: The elevator adds engineering complexity
Planning Your Flagship Build
Pre-Build Preparation (1-2 weeks before)
- Research the real structure: Watch documentaries, view photos, understand history
- Prepare workspace: Dedicated table that can remain undisturbed
- Acquire storage solutions: Clear bins for sorted pieces
- Schedule building time: Block out 2-3 hour windows over several weeks
- Finalize display location: Measure, test weight capacity, plan lighting
During Build (4-8 weeks)
- Progress photos: Document each major milestone
- Take breaks: Step away when frustration builds
- Quality control: Regularly check alignment and stability
- Enjoy the process: This is a journey, not a race
Post-Build Care
- Professional photo shoot: Capture your achievement properly
- Establish cleaning routine: Dust weekly with soft brush
- Monitor for piece stress: Heavy builds can sag over time
- Share online: LEGO community celebrations on r/lego, Instagram #AFOLarchitecture
Understanding Architectural Design Principles
How LEGO Translates Real Architecture
LEGO designers face a fascinating challenge: How do you recreate a 620-foot tall Eiffel Tower with plastic bricks? Understanding their solutions teaches you architectural thinking.
1. Selective Detail
Principle: Not everything can be represented at LEGO scale. Designers choose which details to emphasize.
Example (Taj Mahal):
- Emphasized: The four minarets, central dome, decorative inlay patterns
- Simplified: Individual marble blocks, fine calligraphy, garden details
- Abstracted: The reflecting pools become flat tile surfaces
2. Scale Compression
Principle: Different parts of a structure use different scales to fit the medium.
Example (Colosseum):
- Arches: Nearly to-scale with accurate proportions
- Seating: Compressed—real seating would be 10× more rows
- Arena floor: Abstracted as a simple base
3. Color as Texture
Principle: LEGO can't replicate material texture, so it uses color variation to suggest it.
Example (Notre-Dame):
- Mix of light tan, tan, and dark tan suggests weathered limestone
- Random color placement mimics natural stone variation
- Darker colors in recesses create depth perception
Design Principles You Can Apply to MOCs
If you want to create custom architecture builds (MOCs), these principles guide success:
- Research thoroughly: Study photos from multiple angles
- Identify signature elements: What makes this building recognizable?
- Choose appropriate scale: 1:200 for most medium builds works well
- Build the base first: Establish footprint and proportion
- Work in sections: Facade, sides, roof—complete each before moving on
- Test stability constantly: Don't wait until the end to discover structural issues
- Embrace imperfection: LEGO has geometric constraints—work with them, not against them
Display Strategies for Architecture Collections
The Architecture Display Philosophy
Unlike Star Wars or City sets, Architecture demands a museum-like presentation:
- Breathing room: Space between sets prevents visual clutter
- Appropriate lighting: Subtle, directional light enhances detail
- Consistent height: Eye-level display (5-6 feet) for best viewing
- Contextual grouping: Organize by geography, era, or architect
Display Configurations by Collection Size
Starter Collection (1-3 Sets)
Best for: Skylines or single landmark
- Floating shelf: Single 36" shelf above desk or TV
- Bookshelf integration: Dedicate one shelf to Architecture
- Office desk: Skylines work beautifully as desk décor
Growing Collection (4-8 Sets)
Best for: Mix of skylines and medium landmarks
- Staggered floating shelves: Three shelves at varying heights
- IKEA DETOLF cabinet: Glass sides, 4 shelves, perfect scale for most Architecture
- Dedicated wall: Gallery-style arrangement with individual shelves
Serious Collection (10+ Sets)
Best for: Multiple large landmarks
- Dedicated room: Spare bedroom or office
- Custom shelving: Built-in shelves with integrated lighting
- Thematic zones: European wing, American wing, Asian wing
- Rotating display: Storage for some sets, rotate seasonally
Lighting Your Architecture Display
Proper lighting transforms Architecture from "toys on a shelf" to art installation:
LED Strip Lighting (Budget: $20-50)
- Install under shelves: Illuminates the set from below
- Warm white (3000K): Best for tan/brown buildings
- Cool white (5000K): Best for modern white/gray buildings
- Dimmable: Control intensity for different moods
Spotlights (Budget: $50-150)
- Track lighting: Adjustable spots for multiple sets
- Picture lights: Small directional lights above each set
- Smart bulbs: Change color temperature via app
Professional Museum Lighting (Budget: $200+)
- Fiber optic lighting: Pinpoint illumination without heat
- Recessed ceiling spots: Clean, permanent solution
- UV-filtered lights: Prevent yellowing over decades
Creating Custom MOCs (My Own Creations)
When You're Ready to Design Your Own
After building 5-10 official Architecture sets, you'll develop the skills to create custom designs. Here's how to start:
Step 1: Choose Your Subject
Best choices for first MOC:
- Local landmark you know well
- Building with clear geometric shape (no crazy curves)
- Structure with available reference photos
- Size appropriate for your skill (1,000-2,000 pieces)
Step 2: Research and Planning
- Photo collection: Front, back, sides, top, detail shots
- Measurements: Real dimensions to calculate scale
- Architectural drawings: Floor plans if available
- Sketch initial design: Rough drawings of how LEGO will represent it
Step 3: Digital Design (Optional but Recommended)
Software options:
- Bricklink Studio (FREE): Official LEGO digital designer
- LeoCAD (FREE): Open-source alternative
- LEGO Digital Designer (FREE, discontinued but still works): Official legacy software
Benefits of digital design:
- Test designs without buying pieces
- Automatic part lists for ordering
- Easy to make changes and revisions
- Share designs with community for feedback
Step 4: Source Your Pieces
- Bricklink.com: Global marketplace for LEGO pieces
- BrickOwl.com: Alternative marketplace
- LEGO Pick a Brick: Official source, limited selection but reliable
- Local LEGO stores: Pick-a-Brick walls for common pieces
Step 5: Build and Iterate
- Build bottom-up (foundation → walls → roof)
- Test stability at each level
- Don't be afraid to tear down and rebuild sections
- Document your process with photos
Investment Value & Market Trends
Architecture Sets as Investments
Architecture sets appreciate more slowly than Star Wars UCS, but offer steady, reliable growth:
| Set | Release Price | Current Value (Sealed) | ROI |
|---|---|---|---|
| Taj Mahal (10189-1) | $299.99 | $3,000-$3,500 | 900-1,066% |
| Tower Bridge (10214-1) | $239.99 | $500-$700 | 108-192% |
| Sydney Opera House (10234-1) | $329.99 | $600-$800 | 82-142% |
Current Sets with Investment Potential
- Colosseum (10276): Likely 40-80% appreciation within 5 years post-retirement
- Eiffel Tower (10307): Record piece count may drive collector demand
- Taj Mahal (21056): Remake of original, proven design
Architecture sets are best for long-term holds (7-10+ years). They don't spike like Star Wars, but provide steady appreciation with lower risk. Buy what you love first, consider investment potential second.
Your Architecture Journey Starts Now
From your first skyline to that eventual Colosseum build, LEGO Architecture offers a lifetime of discovery. Remember:
- Start small: Skylines build confidence without overwhelming
- Learn continuously: Each build teaches new techniques
- Display thoughtfully: Good presentation elevates the experience
- Join the community: Share your builds, learn from others
Ready to Build?
Browse our Architecture collection or read our Best LEGO Sets for Adults guide for more recommendations.
Use Our Tools to Go Further
Get more insights about the sets mentioned in this article with our free LEGO tools