LEGO Rendering: Creating Photorealistic Images of MOCs
Supporting Free Content
When you purchase through our links, we earn a small commission at no extra cost to you. As an Amazon Associate and eBay Partner, this helps us keep bringing you expert LEGO® reviews and guides. Thank you for your support!
Create stunning photorealistic images of your LEGO MOCs using BrickLink Studio, Blender, and professional rendering techniques.
LEGO rendering is the exciting process of digitally transforming your LEGO MOCs (My Own Creations) or official sets into stunning, photorealistic images using specialized software. This allows builders to visualize their creations with incredible detail, experiment with lighting and environments, and share their masterpieces in a way that rivals professional photography, all without needing to physically build the model first. Whether you're a seasoned builder looking to present your intricate designs or a newcomer eager to explore the digital side of LEGO, mastering rendering opens up a whole new dimension of creative expression.
What Exactly is LEGO Rendering?
At its core, LEGO rendering involves taking a digital 3D model of a LEGO creation and generating a 2D image from it, complete with realistic lighting, shadows, textures, and reflections. Think of it as virtual photography for your LEGO builds. Instead of snapping a picture with your phone, you're using powerful software to simulate how light interacts with plastic bricks in a virtual studio. This process brings your digital designs to life, making them appear as if they were physically constructed and perfectly photographed.
A "MOC" stands for My Own Creation, referring to any LEGO model designed and built by a fan rather than an official LEGO set. Rendering MOCs is particularly popular as it allows creators to showcase their unique visions before committing to purchasing all the bricks, or even if the model is purely conceptual.
Why Render Your LEGO MOCs? The Benefits Unpacked
The appeal of LEGO rendering extends far beyond just pretty pictures. For adult builders (AFOLs - Adult Fans of LEGO), it offers a suite of practical and creative advantages:
- Unparalleled Presentation: Elevate your designs. A high-quality render can make even a simple MOC look like a professional product shot, attracting more attention and appreciation for your work. This is especially true for complex, display-worthy sets like the or the intricate details of the PRODUCT_LINK[Item Number: 4000038-1].
- Virtual Prototyping: Before investing hundreds or thousands of dollars in bricks, rendering allows you to visualize your MOCs in incredible detail. You can identify structural flaws, color mismatches, or aesthetic improvements long before you start building physically. This is invaluable for large-scale projects, such as a sprawling landscape for a or an expansive display for a PRODUCT_LINK[Item Number: 9452-1].
- Creative Freedom: Experiment with countless color schemes, brick types, lighting setups, and environments without any physical limitations. Want to see your soaring through a misty mountain pass or your standing under a spotlight? Rendering makes it possible.
- Showcasing Concepts: For those who design more than they build, rendering is the ultimate tool. You can share your ideas with online communities, potential collaborators, or even submit them to platforms like LEGO Ideas, all with stunning visuals. Imagine the impact of a beautifully rendered with perfect lighting and backdrop.
- Learning and Skill Development: Engaging with rendering software hones your understanding of composition, lighting, and digital art principles. It's a fantastic way to expand your creative skillset beyond physical brick-building.
- Beyond Physical Limitations: Some MOCs might be too fragile, too large, or simply impossible to build physically due to rare parts or gravity. Rendering bypasses these limitations, allowing you to bring any concept to "life."
Essential Tools for Your LEGO Rendering Journey
To dive into the world of LEGO rendering, you'll need the right software. The good news is there are excellent options for every skill level, from beginner-friendly to professional-grade.
1. BrickLink Studio 2.0 (Free & Beginner-Friendly)
- What it is: Developed by BrickLink, a LEGO subsidiary, Studio 2.0 is a comprehensive digital LEGO design program. It's not just a builder; it includes a powerful built-in rendering engine called POV-Ray.
-
Key Features:
- Intuitive drag-and-drop interface for building.
- Vast library of LEGO parts, constantly updated.
- Integrated rendering with customizable lighting, backgrounds, and camera angles.
- Directly connected to BrickLink's marketplace for easy part ordering.
- Why it's recommended: This is arguably the best starting point for anyone new to LEGO rendering. It's free, relatively easy to learn, and produces impressive results without needing to export to other software. You can design a detailed or a complex PRODUCT_LINK[Item Number: 9280-1] and render it all within the same application.
- Perfect for: Beginners, MOC designers who want quick, good-looking renders, and anyone looking for an all-in-one solution.
2. Blender (Free & Professional-Grade)
- What it is: Blender is a free and open-source 3D creation suite used for modeling, animation, sculpting, VFX, and, of course, rendering. It's a professional tool with a steep learning curve but offers unmatched flexibility.
-
Key Features:
- Advanced modeling tools (though you'll import LEGO models).
- Two powerful rendering engines: Eevee (real-time) and Cycles (path tracing for photorealism).
- Extensive control over materials, lighting, environments, and physics.
- Vast community and tutorials available.
- Why it's recommended: If you're serious about achieving hyper-realistic renders with custom backdrops, advanced lighting effects, or even animations, Blender is the way to go. You'll typically design your MOCs in Studio 2.0 and then export them (often as .obj or .fbx files) into Blender for the final rendering process. With Blender, you can make the truly pop with dynamic lighting.
- Perfect for: Experienced 3D artists, those willing to invest time in learning a powerful tool, and anyone aiming for the highest level of realism.
3. Other Rendering Engines (Advanced Options)
- POV-Ray: While integrated into Studio 2.0, POV-Ray can also be used as a standalone ray tracer. It's command-line driven, which can be daunting, but offers immense control for those who master it.
- V-Ray, Octane Render, Redshift: These are commercial, professional rendering engines often used in conjunction with 3D modeling software like 3ds Max, Maya, or Cinema 4D. They offer incredibly fast and realistic results but come with a significant cost and a very high learning curve. These are typically for professional studios or very dedicated hobbyists who want to push the boundaries of realism for models like the detailed or the striking PRODUCT_LINK[Item Number: k34431-1].
Hardware Considerations
Rendering can be very demanding on your computer's hardware. While Studio 2.0's renderer is relatively forgiving, advanced engines like Blender's Cycles benefit greatly from:
- Powerful CPU: Essential for general processing and some rendering tasks.
- Dedicated GPU (Graphics Card): Modern rendering engines leverage GPUs for significantly faster render times, especially NVIDIA cards with CUDA cores.
- Ample RAM: 16GB is a good baseline, 32GB+ is better for complex scenes with many bricks, like a full-scale render of the PRODUCT_LINK[Item Number: k34433-1].
- Fast Storage (SSD): Helps with loading large models and textures quickly.
The LEGO Rendering Process: A Step-by-Step Guide
Ready to bring your digital bricks to life? Here's a general workflow you can follow:
Step 1: Design Your MOC in Digital Software
This is where it all begins. Use a digital LEGO builder like BrickLink Studio 2.0. This is the foundation of your render. Pay attention to detail, brick placement, and color accuracy. For example, if you're building a vibrant scene, ensure your digital bricks perfectly match the real-world LEGO color palette. Consider building a classic like the digitally to practice basic rendering principles.
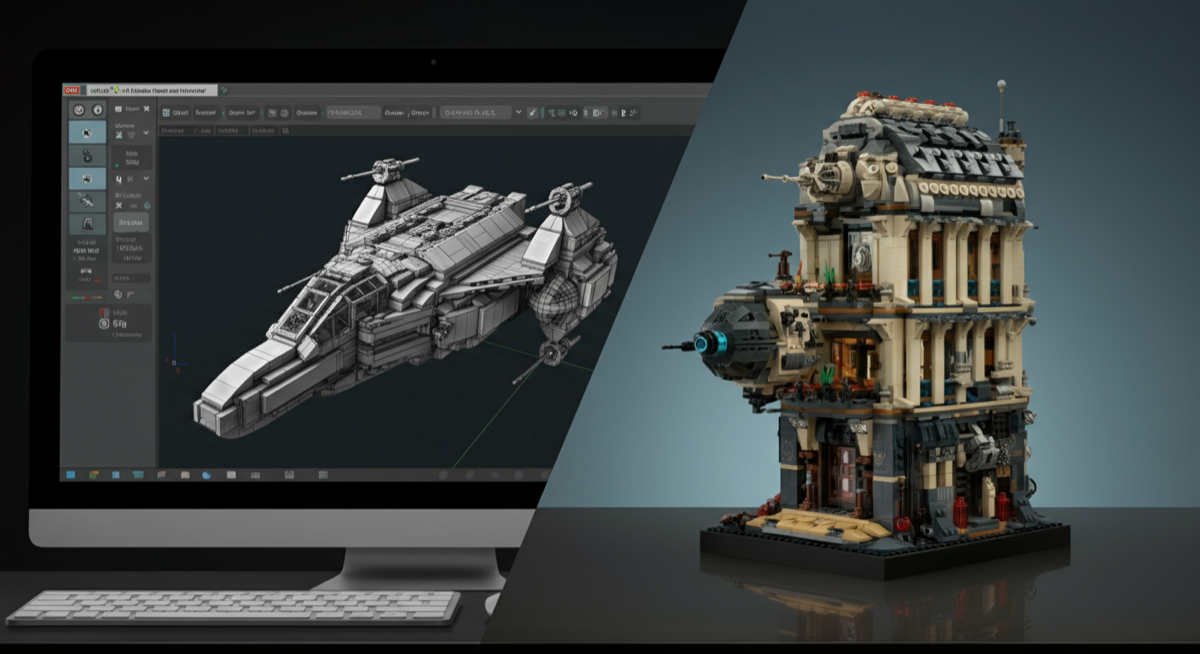
Step 2: Prepare Your Model for Rendering
In Studio 2.0, this means setting up your scene directly. For other software like Blender, you'll need to export your model. Studio 2.0 can export to various formats, including .obj, which is widely compatible. When exporting, ensure all parts are correctly scaled and oriented.
Step 3: Set Up Your Virtual Studio
- Import (if necessary): Load your exported model into your chosen rendering software (e.g., Blender).
- Materials: Ensure your bricks have realistic LEGO plastic materials applied. Studio 2.0 handles this automatically. In Blender, you might use pre-made LEGO material shaders or create your own, focusing on glossiness, subtle imperfections, and color accuracy.
-
Lighting: This is crucial for realism. Experiment with different light sources:
- Key Light: The main light source, typically angled to create prominent shadows.
- Fill Light: Softer light to reduce harsh shadows.
- Backlight (Rim Light): Highlights edges for separation from the background.
- Environment Lighting (HDRI): Use High Dynamic Range Images to simulate realistic outdoor or indoor environments, casting natural light and reflections.
- Environment/Background: Choose a simple solid color, a gradient, or an image background. For advanced renders, create a 3D environment or diorama that complements your MOC. Imagine placing a rendered within a meticulously detailed park scene.
- Camera Angle and Composition: Just like real photography, composition matters. Experiment with different camera angles, focal lengths, and depths of field to highlight the best features of your MOC. A slightly off-center rule-of-thirds composition often looks more dynamic.
Step 4: Render the Image
Once your scene is set up, hit the render button! This process can take anywhere from a few seconds to several hours, depending on your hardware, software, scene complexity, and desired quality settings. Be patient, especially for high-resolution, photorealistic renders. Many programs offer "preview renders" that are faster but lower quality, perfect for testing your setup before a final, high-fidelity render.
Step 5: Post-Processing (Optional but Recommended)
Even the best renders can benefit from a touch-up in image editing software like Adobe Photoshop or GIMP. You can adjust:
- Color Correction: Enhance saturation, contrast, and color balance.
- Levels/Curves: Fine-tune brightness and contrast.
- Sharpening: Make details pop.
- Vignette: Add a subtle darkening around the edges to draw attention to the center.
- Noise Reduction: Clean up any graininess from the rendering process.
Tips for Achieving Photorealism in Your LEGO Renders
To truly make your digital bricks indistinguishable from real ones, consider these advanced tips:
- Subtle Imperfections: Real LEGO bricks aren't perfectly pristine. Add subtle surface scratches, dust, or even fingerprints (if applicable) through texture maps or procedural shaders. This realism is key for showcasing individual studs on a mosaic like the PRODUCT_LINK[Item Number: k34432-1].
- Accurate Materials: Focus on the nuances of LEGO plastic. It's not just shiny; it has a specific reflectivity and subtly translucent quality, especially with lighter colors.
- Depth of Field: Use a shallow depth of field to blur the background and foreground, drawing the viewer's eye to your MOC, just like a macro photograph.
- Environment Lighting (HDRI): As mentioned, HDRIs are powerful. They not only light your scene but also provide realistic reflections in the glossy plastic.
- Volumetric Effects: Add atmospheric effects like fog, haze, or dust motes to create a sense of depth and mood, especially impactful for epic scenes featuring the PRODUCT_LINK[Item Number: 3724-1].
- Reference Real Photos: Study professional LEGO photography. Analyze how they light their models, compose their shots, and handle reflections. Try to replicate those effects in your renders.
Showcasing Your Rendered Masterpieces
Once you've poured your creativity into a stunning render, it's time to share it! Online platforms are teeming with LEGO enthusiasts eager to see your work:
- Flickr & Instagram: Visual platforms where you can easily share your images and connect with other builders. Use relevant hashtags like #LEGOMOC, #LEGORender, #AFOL.
- Reddit (r/lego, r/legomoc, r/digitallego): Thriving communities where you can post your renders, get feedback, and engage in discussions.
- BrickLink Gallery: Directly integrated with Studio 2.0, you can upload your renders to the BrickLink Gallery to showcase your designs alongside your parts lists.
- Personal Portfolio/Website: For serious designers, a dedicated online portfolio is a great way to display your best work professionally.
Consider creating a series of renders for a beloved set like the LEGO Set 10332, showing it in different lighting conditions or seasons. Or, if you've designed a unique building like the PRODUCT_LINK[Item Number: 910009-1], render it from multiple angles to highlight all its architectural details.
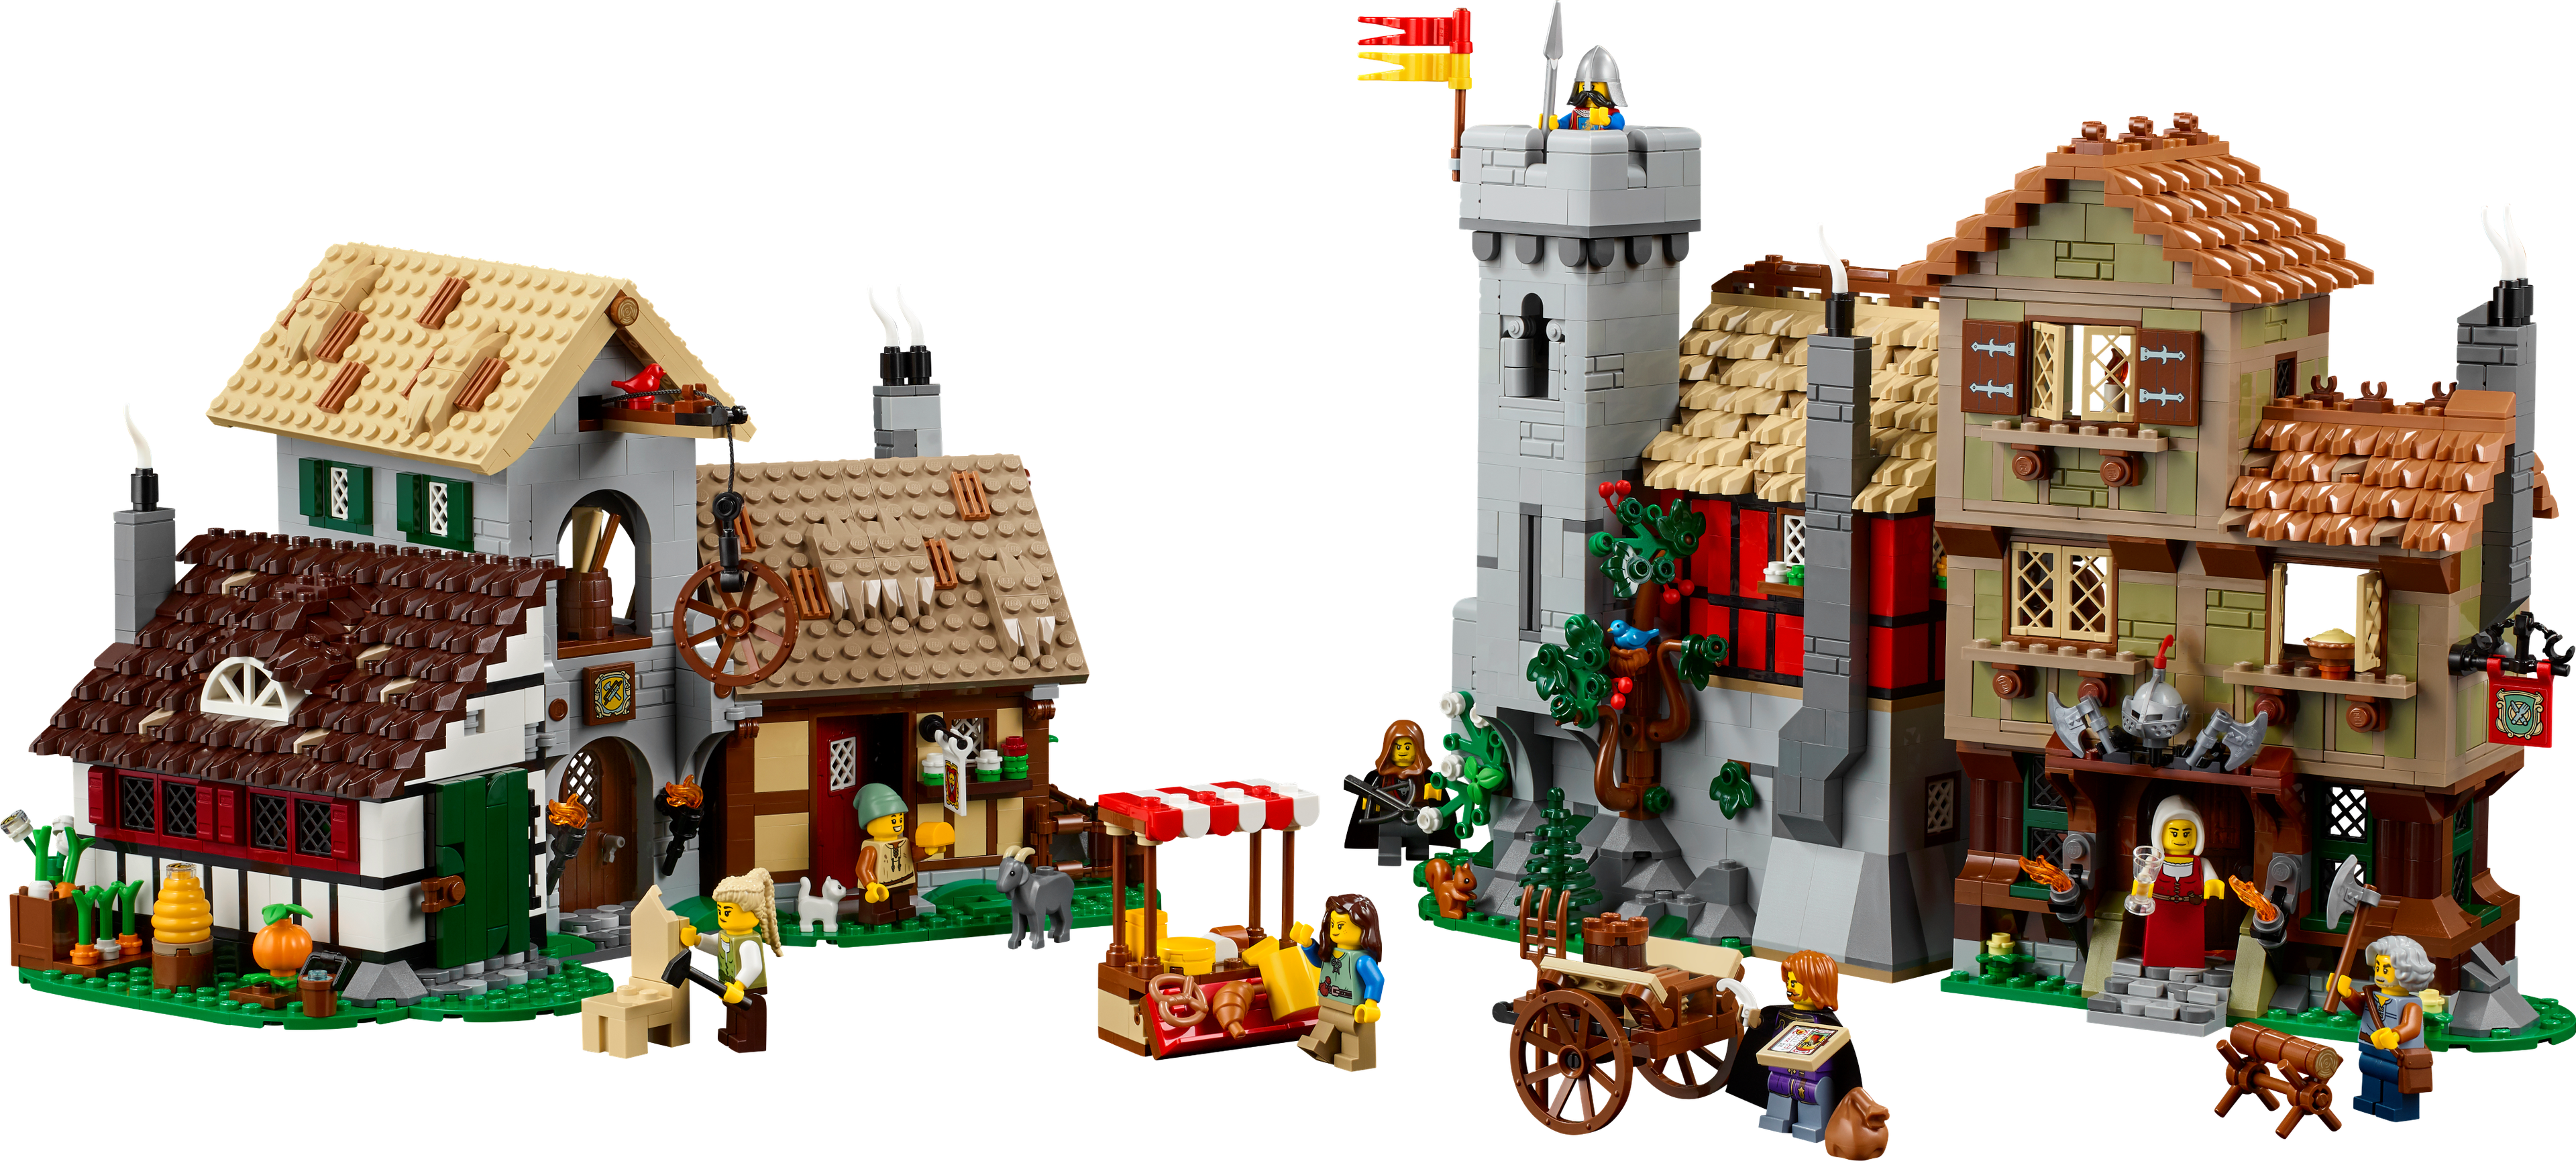
Step back in time with 3,308 pieces to create a vibrant medieval village full of charming details and stories. Includes 8 minifigures!
Quick Product Comparison: Top Sets for Inspiring Renders
Here's a look at some fantastic LEGO sets that offer great potential for stunning renders, whether you're building them physically or digitally.
| Set Name | Item Number | Piece Count | Category | Best For Rendering |
|---|---|---|---|---|
| Modular LEGO Store | 2124 | BrickLink Designer Program | Intricate architectural details, urban scenes, realistic lighting challenges. | |
| Lego Mosaic Dino | 2847 | Mosaic | Highlighting individual stud/tile textures, detailed pixel art effects, challenging reflections. | |
| LEGO Icons Medieval Town Square | LEGO Set 10332 | 3304 | Icons | Complex environments, rustic textures, atmospheric lighting, historical settings. |
| LEGO Star Wars AT-AT | LEGO Set 75313 | 6785 | Star Wars (UCS) | Massive scale, mechanical details, weathered effects, dramatic lighting in sci-fi environments. |
| LEGO Ideas Vincent van Gogh - The Starry Night | LEGO Set 21333 | 2316 | Ideas | Artistic interpretation, unique textures, replicating painting styles digitally. |
What to Consider When Buying Software and Hardware for Rendering
Making the right choices for your rendering setup can significantly impact your experience and the quality of your output. Here are key factors to consider:
- Your Skill Level and Goals: If you're just starting, a free, integrated solution like BrickLink Studio 2.0 is ideal. If you're an experienced 3D artist aiming for professional results, investing time in Blender or commercial software might be worth it. Define what you want to achieve before you buy.
- Learning Curve: Be realistic about the time you're willing to invest. Studio 2.0 is relatively quick to pick up, while Blender requires dedication. There are countless tutorials for both, but the journey differs significantly.
- Community Support: A strong online community means more tutorials, troubleshooting help, and shared resources. Blender has an enormous global community, as does the BrickLink Studio user base.
- Hardware Requirements: As discussed, rendering is CPU/GPU intensive. Assess your current computer's capabilities. If you're serious about high-quality renders, upgrading your graphics card or RAM might be necessary. Look for benchmarks for your chosen software.
- Budget: While Studio 2.0 and Blender are free, commercial rendering engines and powerful hardware can be significant investments. Factor in potential costs for premium asset packs (e.g., advanced LEGO material shaders for Blender) if you want to push realism.
- Integration with Building Software: Seamless workflow is key. If you build in Studio 2.0, its integrated renderer is a huge advantage. If you prefer another digital builder, ensure it can export files compatible with your chosen rendering software.
Frequently Asked Questions About LEGO Rendering
What is the best software for LEGO rendering for beginners?
For beginners, BrickLink Studio 2.0 is highly recommended. It's free, user-friendly, and has a built-in rendering engine (based on POV-Ray) that produces excellent results without needing to export your models to separate programs. It's an all-in-one solution that allows you to design your MOCs and render them effectively.
Can I render official LEGO sets, or only MOCs?
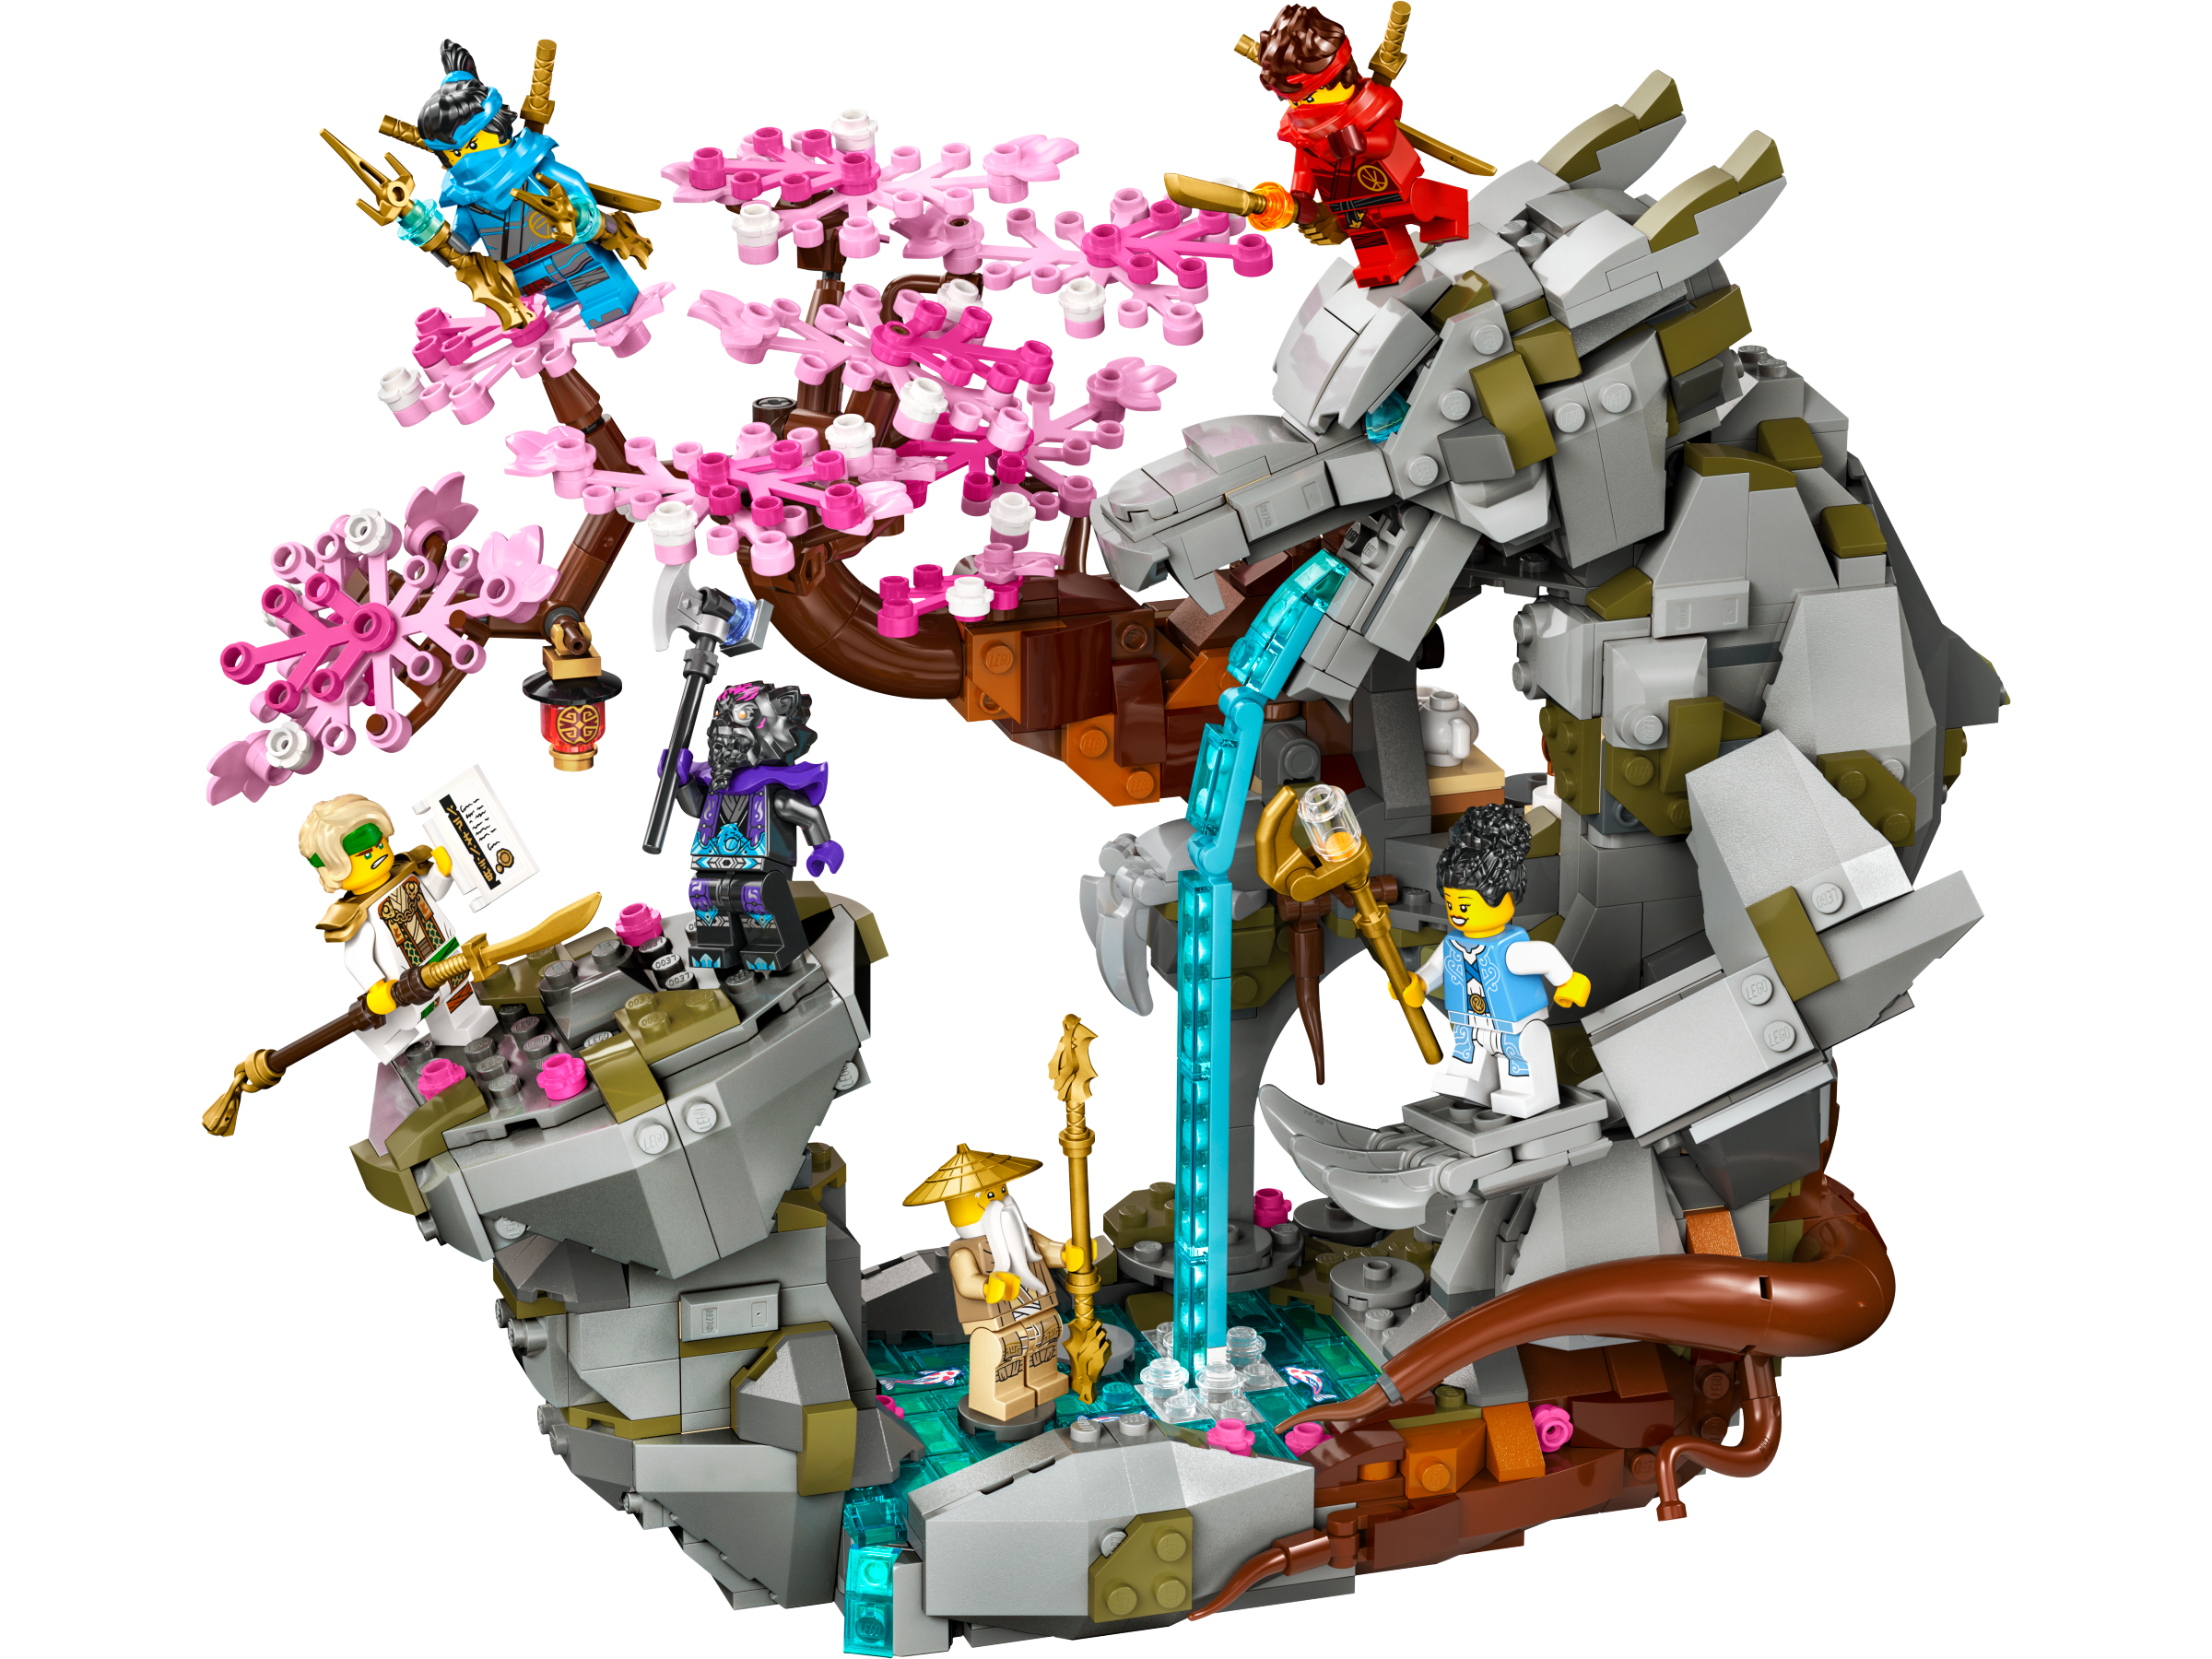
Yes, you can absolutely render official LEGO sets! Many digital builders, including BrickLink Studio 2.0, allow you to import and build official sets digitally, or you can download existing digital models. Rendering official sets, such as the LEGO Set 71819 or the LEGO Set 10332, is a great way to practice your rendering skills and create stunning virtual product shots.
How long does it take to render a LEGO model?
The time it takes to render a LEGO model varies significantly. Factors include the complexity of your model (number of bricks, intricate details), the resolution of the output image, the quality settings (e.g., number of light bounces, anti-aliasing), and most importantly, your computer's hardware (CPU/GPU). Simple renders can take minutes, while complex, high-resolution photorealistic renders on average hardware can take several hours.
Do I need a powerful computer for LEGO rendering?
While you can start rendering on a moderately powerful computer, achieving high-quality, photorealistic results, especially with advanced software like Blender, greatly benefits from powerful hardware. A dedicated graphics card (GPU), ample RAM (16GB+), and a fast processor (CPU) will significantly reduce render times and allow you to work with more complex scenes. For basic renders in Studio 2.0, most modern computers will suffice.
What are HDRI images, and why are they important for LEGO rendering?
HDRI stands for High Dynamic Range Image. These are panoramic images that capture a full range of light information (from brightest highlights to darkest shadows) from a real-world location. In rendering, HDRIs are used as environment maps to light your scene realistically and provide accurate reflections on glossy surfaces like LEGO bricks. They are crucial for achieving photorealistic lighting and making your digital models look like they exist in a real environment.
Where can I find digital LEGO parts for my MOCs?
Digital LEGO parts are typically built into the software you use. BrickLink Studio 2.0 has an extensive and regularly updated library of almost all official LEGO parts and colors. Other software might require importing part libraries, often available from the LEGO community. These libraries are usually free and maintained by dedicated fans, ensuring you have access to virtually any brick you might need for your digital creations.
Can I animate my LEGO renders?
Yes! While more advanced, many 3D rendering software packages, especially Blender, offer robust animation tools. You can create stop-motion style animations, intricate camera movements around your MOC, or even animate individual LEGO elements. This requires a deeper understanding of the software but can lead to incredibly engaging content, truly bringing your digital LEGO creations to life.
Conclusion
LEGO rendering is an incredible skill that empowers builders to unleash their creativity, visualize their MOCs with stunning clarity, and share their passion in ways previously only possible with expensive photography studios. From the accessibility of BrickLink Studio 2.0 to the professional-grade power of Blender, there's a tool for every enthusiast. By understanding the process, embracing the right techniques, and selecting inspiring sets like the architectural marvel of or the artistic challenge of PRODUCT_LINK[Item Number: k34431-1], you can transform your digital bricks into breathtaking works of art.
So, fire up your software, experiment with lighting, and start rendering your LEGO dreams into photorealistic reality. The digital brick world awaits your next masterpiece!
Unlock photorealistic LEGO rendering! Learn how to transform your MOCs into stunning digital images with expert tips on software, lighting, and techniques. Discover the best tools and sets.
LEGO rendering, photorealistic LEGO, MOC rendering, BrickLink Studio 2.0, Blender, LEGO digital design, LEGO MOCs, LEGO display, 3D rendering, LEGO software
Dive into the world of LEGO rendering! This comprehensive guide teaches you how to create stunning, photorealistic images of your LEGO MOCs and official sets using digital tools. Discover essential software, step-by-step processes, and expert tips to bring your brick creations to life virtually.
Q: What is the best software for LEGO rendering for beginners?
A: For beginners, BrickLink Studio 2.0 is highly recommended. It's free, user-friendly, and has a built-in rendering engine (based on POV-Ray) that produces excellent results without needing to export your models to separate programs. It's an all-in-one solution that allows you to design your MOCs and render them effectively.
Q: Can I render official LEGO sets, or only MOCs?
A: Yes, you can absolutely render official LEGO sets! Many digital builders, including BrickLink Studio 2.0, allow you to import and build official sets digitally, or you can download existing digital models. Rendering official sets, such as the LEGO Set 71819 or the LEGO Set 10332, is a great way to practice your rendering skills and create stunning virtual product shots.
Q: How long does it take to render a LEGO model?
A: The time it takes to render a LEGO model varies significantly. Factors include the complexity of your model (number of bricks, intricate details), the resolution of the output image, the quality settings (e.g., number of light bounces, anti-aliasing), and most importantly, your computer's hardware (CPU/GPU). Simple renders can take minutes, while complex, high-resolution photorealistic renders on average hardware can take several hours.
Q: Do I need a powerful computer for LEGO rendering?
A: While you can start rendering on a moderately powerful computer, achieving high-quality, photorealistic results, especially with advanced software like Blender, greatly benefits from powerful hardware. A dedicated graphics card (GPU), ample RAM (16GB+), and a fast processor (CPU) will significantly reduce render times and allow you to work with more complex scenes. For basic renders in Studio 2.0, most modern computers will suffice.
Q: What are HDRI images, and why are they important for LEGO rendering?
A: HDRI stands for High Dynamic Range Image. These are panoramic images that capture a full range of light information (from brightest highlights to darkest shadows) from a real-world location. In rendering, HDRIs are used as environment maps to light your scene realistically and provide accurate reflections on glossy surfaces like LEGO bricks. They are crucial for achieving photorealistic lighting and making your digital models look like they exist in a real environment.
Q: Where can I find digital LEGO parts for my MOCs?
A: Digital LEGO parts are typically built into the software you use. BrickLink Studio 2.0 has an extensive and regularly updated library of almost all official LEGO parts and colors. Other software might require importing part libraries, often available from the LEGO community. These libraries are usually free and maintained by dedicated fans, ensuring you have access to virtually any brick you might need for your digital creations.
Q: Can I animate my LEGO renders?
A: Yes! While more advanced, many 3D rendering software packages, especially Blender, offer robust animation tools. You can create stop-motion style animations, intricate camera movements around your MOC, or even animate individual LEGO elements. This requires a deeper understanding of the software but can lead to incredibly engaging content, truly bringing your digital LEGO creations to life.
Use Our Tools to Go Further
Get more insights about the sets mentioned in this article with our free LEGO tools