Creating Curves with LEGO: Advanced Shaping Techniques
Master advanced LEGO building techniques to create smooth, realistic curves that transform blocky builds into flowing masterpieces.
For many LEGO enthusiasts, the journey begins with stacking bricks to create rigid, angular structures. However, truly mastering the art of LEGO building involves transcending the blocky aesthetic and learning to craft smooth, elegant curves that bring models to life. Creating curves with LEGO is an advanced technique that allows builders to replicate organic shapes, realistic architecture, and dynamic designs, transforming a static model into a flowing masterpiece. This guide will delve into the essential techniques, pieces, and strategies you need to add breathtaking curves to your LEGO MOCs (My Own Creations) and elevate your building skills.
The Art of the Curve: Why Curves Matter in LEGO Builds
LEGO bricks are inherently rectangular, which makes building straight lines and sharp angles intuitive. But the real world is full of curves: the arch of a bridge, the contour of a car, the gentle slope of a hill, or the organic lines of an animal. Replicating these forms in LEGO is what truly distinguishes an advanced builder. Incorporating curves adds:
- Realism: Many real-world objects are not perfectly square. Curves add authenticity to models, whether you're building a vehicle, an animal, or a historic building.
- Aesthetic Appeal: Curves introduce visual flow, softness, and sophistication. They can make a model feel more polished and dynamic, drawing the eye along its lines.
- Structural Integrity: In some cases, curved designs can offer greater stability or allow for more compact construction, especially in complex models like ships or aircraft.
- Expressiveness: Organic shapes convey emotion and movement. A curved dragon looks far more dynamic and alive than a blocky one.
Mastering curves is a hallmark of an expert LEGO builder, opening up new realms of creative expression. It's about seeing beyond the individual brick and understanding how multiple elements can combine to suggest a continuous line.
Fundamental Techniques for Smooth LEGO Curves
Achieving a smooth curve with LEGO often involves a combination of techniques, as no single method fits every situation. Here are the core strategies:
1. SNOT (Studs Not On Top) Building
What it is: SNOT, an acronym for "Studs Not On Top," is perhaps the most revolutionary technique for creating advanced shapes, including curves. It involves building in directions other than the traditional vertical stacking, allowing studs to face sideways, downwards, or even at angles. This technique is crucial for attaching curved elements or creating a smooth outer surface where studs would typically be exposed.
How it helps with curves: By building sideways, you can use plates and tiles to create a "layered" curve, where each layer is slightly offset from the last. It also allows you to mount specialized curved bricks and slopes on their sides, forming a much smoother exterior. Essential SNOT bricks include:
- Headlight Bricks (1x1 with a stud on one side): These tiny but mighty bricks are perfect for minor offsets and connecting perpendicular structures.
- Brackets (various sizes like 1x2-1x2, 1x1-1x2 inverted): Offer robust connections for changing building directions.
- Bricks with Studs on Side (e.g., 1x1, 1x2, 1x4): Directly provide connection points for SNOT techniques.
- Technic Bricks with Holes: Can be used with Technic pins to create strong, multi-directional connections.
2. Offsetting (Half-Plate/Half-Stud Techniques)
What it is: Offsetting involves shifting parts by less than a full stud width, typically by half a stud or half a plate thickness. This allows for incredibly fine adjustments to create gentle slopes and intricate curves that wouldn't be possible with full-stud increments.
How it helps with curves:
- Jumper Plates (1x2 plate with one stud in the middle): These are the quintessential half-stud offset pieces. By placing a jumper plate, you effectively shift the next layer of bricks by half a stud in any direction, allowing for precise angling and rounding.
- Plates with clips and Bars: By connecting a plate with a clip to a bar, you can achieve various offsets and angles.
- Tiles on their sides: While less common for structural curves, tiles can be used to create very thin, delicate curves or to smooth out transitions.
3. Hinging and Ball Joints
What it is: Hinges and ball joints provide articulation and allow for adjustable angles in your builds. They are vital for dynamic posing and creating organic, flowing shapes that can be modified.
How it helps with curves:
- Hinge Bricks and Plates: Can create sweeping arcs or specific angles, often used for vehicle bodies, wings, or architectural elements like domes. By connecting multiple hinge plates, you can approximate a smooth curve.
- Ball Joints: Offer 360-degree rotation and flexible angles, perfect for limbs on creatures, articulated tails, or complex organic contours. They allow for very natural, fluid movement and shaping.
4. Dedicated Curved Elements
What it is: LEGO offers a wide array of specialized pieces explicitly designed to create curves. These are often the first choice for achieving smooth, intentional arcs.
How it helps with curves:
- Curved Slopes: Available in various angles (e.g., 1x1, 1x2, 2x2, 3x3, 4x4, 6x1, 8x1), these are perfect for vehicle bodies, architectural domes, and smooth transitions. For instance, the utilizes many curved slopes to achieve its majestic form.
- Arch Bricks: Come in different widths and heights (e.g., 1x3, 1x4, 1x6, 1x8, 2x2, 2x4, 2x6) and are ideal for doorways, windows, and decorative architectural features.
- Macaroni Bricks (e.g., 1x1, 1x2, 1x3, 1x4 round bricks): These offer smooth, rounded edges and corners. When combined, they can create full circles or cylinders.
- Round Bricks, Plates, and Tiles: Essential for columns, pipes, and any perfectly circular elements. Stacking round plates of decreasing size can create a cone shape.
- Wedges and Corner Plates/Tiles: While not strictly "curved," these elements help to smooth out sharp corners and create angled transitions that approximate curves.
5. Flexible Elements
What it is: These are LEGO parts made from softer, pliable plastic that can be bent and held in shape by other elements.
How it helps with curves:
- Hoses and Tubes: Excellent for creating wires, cables, or decorative accents with natural curves. They can be threaded through Technic holes or held by clips.
- Flex Axles / Soft Axles: These flexible Technic axles can be bent into specific shapes and used to create structural curves, especially in organic models or vehicles.
- Ribbed Hoses: Offer a bit more rigidity than standard hoses but still allow for curves.
Advanced Strategies for Mastering Organic Shapes
Beyond the fundamental techniques, there are broader strategies that experienced builders employ to achieve truly stunning curved creations.
1. Digital Design Tools
What it is: Software like BrickLink Studio (formerly LEGO Digital Designer or LDD) allows builders to design models virtually before committing to physical bricks. These tools provide an infinite canvas and access to every LEGO part ever made.
How it helps with curves: Digital tools are invaluable for planning complex curves. You can experiment with different elements, angles, and SNOT techniques without the hassle of physical reassembly. Many builders use these programs to "blueprint" their curved sections, ensuring structural integrity and aesthetic flow before ordering specific parts. For example, planning the intricate curves of a large sculpture like is much easier in a digital environment.
2. "Greebling" and Texture
What it is: Greebling refers to the technique of adding small, intricate details to a model's surface using various small parts (grilles, tiles, small plates, clips, etc.) to create a sense of mechanical complexity or texture.
How it helps with curves: While greebling itself isn't about creating curves, it can be used to enhance or even mask the "stepping" effect that often occurs when building curves with square bricks. Strategic greebling can draw the eye away from slight imperfections, or it can be used to add detail that follows the contour of a curve, making it feel more integrated and refined. For example, a spaceship's hull might use greebling to imply paneling that flows with its curved form.
3. Trial and Error / Prototyping
What it is: This is the iterative process of building, evaluating, and rebuilding. It's the core of any creative endeavor, and especially crucial for complex LEGO MOCs.
How it helps with curves: Achieving the perfect curve often isn't a "build-it-once" process. It requires patience and experimentation. You might try several combinations of SNOT techniques, specialized parts, and offsets before finding the one that creates the desired aesthetic and structural stability. Don't be afraid to take sections apart and rebuild them; it's part of the learning and refining process.
4. Reference Material and Scale
What it is: Using real-world objects, photos, blueprints, or even other LEGO models as inspiration.
How it helps with curves: When trying to replicate a specific curve (e.g., the fuselage of an airplane or the arch of a famous bridge), having visual reference is key. Pay attention to how the curve changes gradient, where it flattens, and where it sharpens. Understanding the scale of your model relative to the real object will also inform your choice of curved elements and techniques. For example, a small model might use simple curved slopes, while a large-scale replica might require complex SNOT and offsetting techniques to achieve a smooth, gradual transition.
Essential LEGO Elements for Curve Creation
Having a good selection of specialized parts is key to unlocking advanced curve-building potential. Here are some must-have categories:
- Curved Slopes: From small 1x1 quarter circles to large 8x1 curved slopes, these are indispensable for smooth surfaces.
- Arch Bricks: Available in various dimensions, they naturally form arches and rounded corners.
- Round Bricks and Plates: For cylindrical shapes, columns, and smooth details.
- Macaroni Bricks (e.g., 1x1, 1x2, 1x3, 1x4 round bricks): Excellent for corners and creating continuous rounded edges.
- SNOT Bricks: Headlight bricks, various brackets, and bricks with studs on the side are fundamental for changing building directions.
- Hinge Bricks and Plates: For articulated curves and adjustable angles.
- Ball Joints: For highly flexible and organic connections, often seen in creature MOCs.
- Jumper Plates (1x2 plate with one stud): Crucial for half-stud offsets, enabling finer adjustments to curves.
- Flexible Axles and Hoses: For subtle, natural-looking curves and details.
Consider universal building sets or bulk brick collections to expand your part inventory. The and PRODUCT_LINK[Item Number: 9452-1] are fantastic starting points, offering a diverse range of bricks and plates that can be repurposed for various curved applications.
Recommended Sets for Inspiring Curved Builds
While no single set is solely dedicated to teaching "curves," many incorporate advanced techniques or provide a wealth of useful parts. Observing how official LEGO designers tackle curves can be incredibly insightful.
1. For Organic & Sculptural Curves:
- Lego Minifigure: This large-scale Minifigure model, with its 1850 pieces, demonstrates how to render organic human-like shapes using a vast array of curved slopes, plates, and SNOT techniques. It's a masterclass in translating a familiar, rounded form into LEGO. Perfect for builders interested in character or creature design.
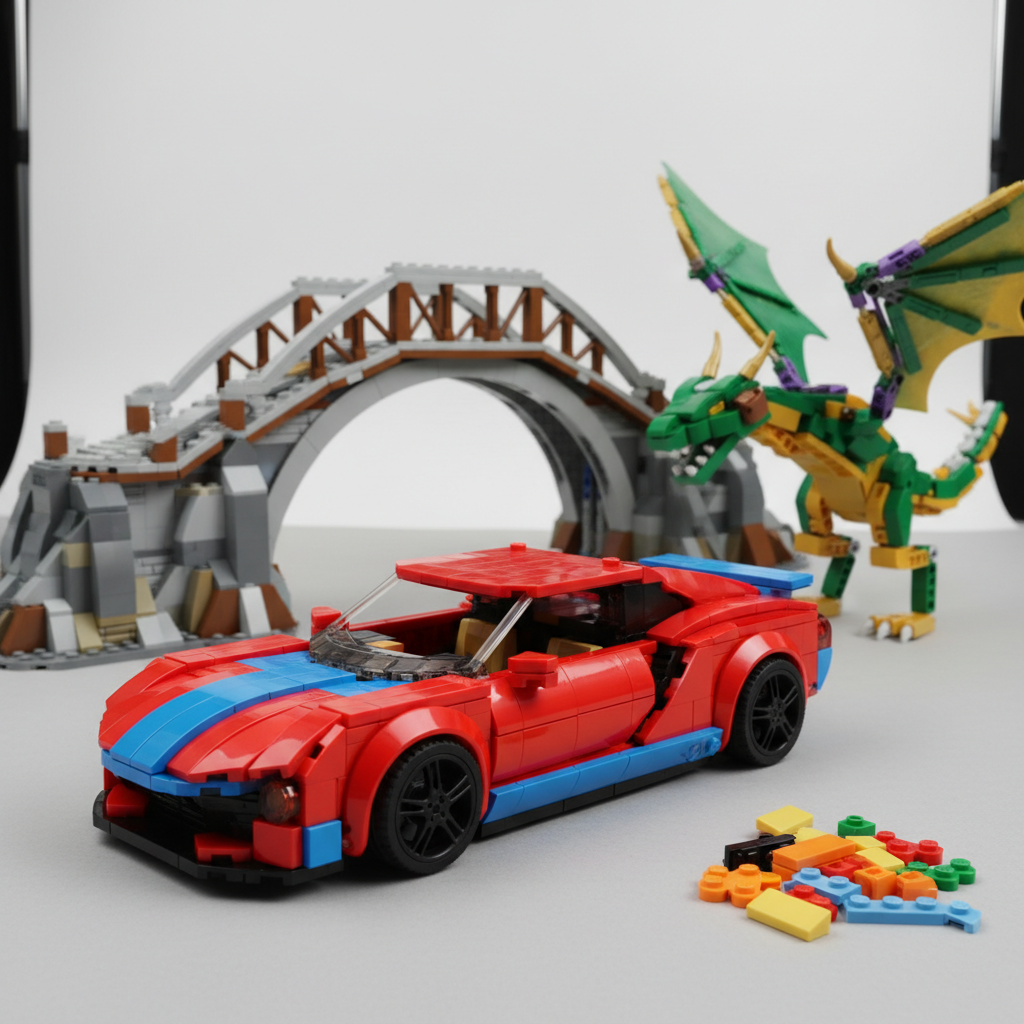
- Lego Dragon: With 1535 pieces, this impressive dragon build is an incredible example of how to create dynamic, flowing, and majestic organic curves for a mythical creature. It likely uses a combination of ball joints, curved slopes, and SNOT to achieve its poseability and detailed form. Ideal for fantasy builders or those looking to create animal models.
- LEGO Factories National Animals: This set, with 1601 pieces, showcases various animal builds, each requiring careful attention to natural curves and contours. It's a great source of inspiration for different approaches to replicating animal anatomy.
2. For Architectural & Structural Curves:
- Modular LEGO Store: Modular buildings often feature intricate architectural details, including rounded corners, arched windows, and decorative elements that employ sophisticated SNOT and plate-layering techniques to achieve curves. This 2124-piece set provides an excellent opportunity to study how curves are integrated into larger, complex structures. It's a must-have for modular building enthusiasts.
- LEGO Campus: This 1494-piece exclusive set likely features architectural elements with various curves, reflecting modern building design. It can provide unique insights into how professional LEGO designers incorporate curves into complex structures.
- LEGOLAND Park: With 1336 pieces, this set often includes miniature models of theme park attractions, many of which utilize curves for rides, landscaping, and building facades. It's a great way to see curves applied in a playful, architectural context.
3. For Visual Curves & Mastering Illusion:
- Lego Mosaic Dino: This 2847-piece mosaic, along with the Lego Mosaic Cat and Lego Mosaic Johnny Thunder, offers a unique perspective on curves. While mosaics are built from square bricks on a grid, the art of mosaic building lies in using color and placement to create the *illusion* of curves and smooth transitions from a distance. These sets teach you to see how individual square elements contribute to an overall rounded shape or flowing line, a crucial skill for any curved build.
4. For General Parts & Experimentation:
- Bonus Lego Basic Town: A 2542-piece universal building set. These types of sets are invaluable for their sheer quantity and variety of basic bricks, plates, and slopes. They provide the raw materials needed to experiment with SNOT, offsetting, and layering techniques for custom curves without having to source individual specialized pieces.
- Giant Lego Topic Set: Another large universal set with 2195 pieces. Similar to the Basic Town set, its strength lies in providing a broad palette of elements for free building and practicing various curve techniques.
- Giant Lego Dacta Basic Set: A 1417-piece universal set, excellent for educational purposes and for simply having a good supply of common bricks needed for prototyping curved structures.
Quick Comparison Table: Top Picks for Curve Inspiration
| Name | Item Number | Piece Count | Best For |
|---|---|---|---|
| 3723-1 | 1850 | Mastering organic, sculptural curves for characters. | |
| 3724-1 | 1535 | Dynamic, flowing curves for fantasy creatures. | |
| 910009-1 | 2124 | Architectural curves and advanced integration into structures. | |
| k34432-1 | 2847 | Understanding the illusion of curves through pixel art and mosaics. | |
| 9287-1 | 2542 | Amassing a diverse parts collection for custom curved MOCs. |
What to Consider When Buying for Curve Building
When you're looking to enhance your curve-building capabilities, keep these factors in mind:
- Part Variety vs. Quantity: While large universal sets like offer quantity, consider specific part orders from services like BrickLink for specialized curved slopes, arches, or SNOT bricks. A balanced approach gives you both the bulk for prototyping and the precision for refining.
- Color Palette: Curves are often more visible when built in a single, consistent color, as color changes can break the visual flow. If you're focusing on a smooth curve, aim for a good supply of parts in your primary build color.
- Digital Tools: Investing time in learning BrickLink Studio (free) can save you money on physical parts by allowing extensive experimentation before purchase. It's a powerful tool for planning complex curved sections.
- Inspiration Sets: Don't just buy sets for their parts; buy them to study their building techniques. Sets like or PRODUCT_LINK[Item Number: 910009-1] are excellent examples of sophisticated curve implementation. Disassemble them carefully to understand their internal structures.
- Patience and Practice: Building curves is an advanced skill that takes time to develop. Don't get discouraged by initial failures. Every attempt is a learning opportunity. The more you experiment with different techniques and pieces, the better you'll become.
Conclusion
Creating curves with LEGO is a rewarding challenge that pushes the boundaries of traditional brick building. It transforms static models into dynamic, realistic, and aesthetically pleasing works of art. By mastering techniques like SNOT, offsetting, hinging, and leveraging dedicated curved elements, you can unlock a new level of creative freedom. Remember to draw inspiration from sets like the organic and PRODUCT_LINK[Item Number: 3724-1], the architectural PRODUCT_LINK[Item Number: 910009-1], and even the visually deceptive mosaics. Stock up on versatile parts from universal sets like PRODUCT_LINK[Item Number: 9287-1], embrace digital design, and most importantly, be patient with yourself. The journey to building breathtaking curves is one of experimentation, learning, and immense satisfaction. Start exploring these advanced shaping techniques today and watch your LEGO creations truly come to life!
Master the art of creating smooth LEGO curves with advanced SNOT, offsetting, and specialized parts. Elevate your MOCs with realistic, organic shapes. Learn essential techniques and discover inspiring sets. LEGO curves, advanced LEGO building, SNOT techniques, LEGO shaping, MOC, LEGO bricks, curved slopes, LEGO techniques, organic LEGO builds, LEGO tips Break free from blocky builds! This guide reveals advanced LEGO techniques for crafting smooth, realistic curves. Learn SNOT, offsetting, and discover the best bricks and sets to elevate your LEGO creations. Q: What is SNOT in LEGO building? A: SNOT stands for "Studs Not On Top." It's a fundamental advanced LEGO building technique where bricks are oriented so their studs face sideways, downwards, or at angles, rather than the traditional upwards direction. This allows for connections on all sides of a brick, enabling highly detailed surfaces, intricate shapes, and especially, smoother curves that would be impossible with traditional stacking. Q: What are the easiest ways to start building curves? A: The easiest way to start is byUse Our Tools to Go Further
Get more insights about the sets mentioned in this article with our free LEGO tools